Note
Before proceeding make sure that you have created a Configuration Profile for Device. For more information read Configuration Profile for Devices. A fast way to create a Configuration Profile together with a Policy is to use the One Click Policy Creation.
¶ Device Policy
A Device Policy is a rule that defines if and which Configuration Profile for Device must be applied to a device. A Device Policy links single devices, groups or classes(classifier) to a Configuration Profile for Devices..
The Device Policy is evaluated by ThinMan Server on every device's startup.
When the Device Policy applies a Configuration Profile for Device, the device is automatically rebooted.
Read also Zero Config with Profile Manager, Roaming Profile with Profile Manager and How to protect the Thin Client with ThinMan Login.


¶ Device Policy Priority
In case a device belongs to more than one policy, ThinMan evaluates which policy should be applied.
From version 8.2.1 ThinMan follows the Policy Tree Order logic, older versions follow the Legacy Priority logic.
¶ Policy Tree Order (ThinMan version 8.2.1 or newer)
The highest priority corresponds to the first policy on the tree policy.
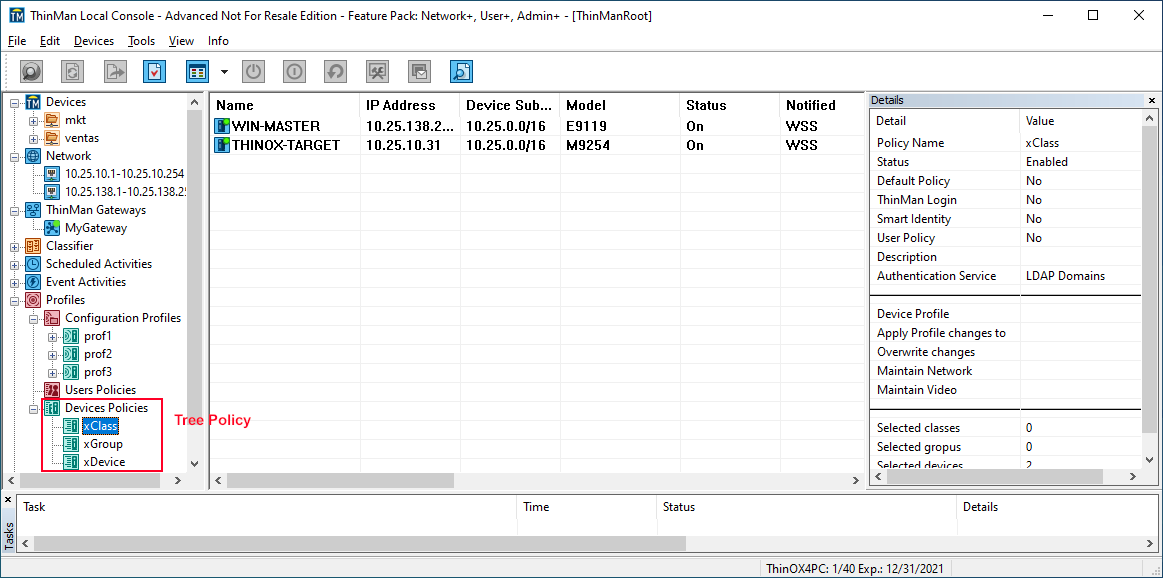
E.g. Suppose you have configured 3 policies (see above image):
- xDevice: it assigns the profile prof1 to the device target.
- xGroup: it assigns the profile prof2 to the group mkt (the target device belongs to this group).
- xClass: it assigns the profile prof3 to the class value rome (the target device is classified with the class value rome)
Which policy is applied to the "THINOX-TARGET" device? The policy with the highest priority under the Policy Tree Order priority is xClass. The first policy on the tree policy applicable to the target device.
¶ Legacy Priority (ThinMan version lower than 8.2.1)
If a device is associated to more than one policy, ThinMan will choose the policy following the priority:
- First Priority: policies associated to single devices.
- Second Priority: policies associated to groups.
- Last Priority: policies associated to classes.
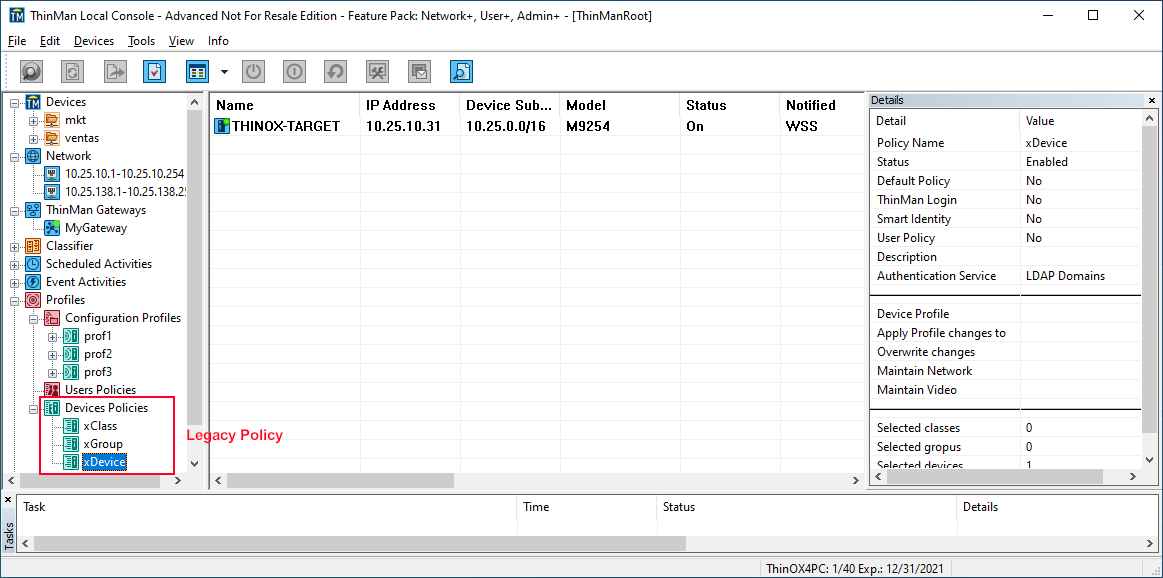
E.g. Suppose you have configured 3 policies (see above image):
- xDevice: it assigns the profile prof1 to the device Target.
- xGroup: it assigns the profile prof2 to the group mkt (the target device belongs to this group).
- xClass: it assigns the profile prof3 to the class rome (the target device is classified as rome)
Which policy is applied to the "THINOX-TARGET" device? The policy with the highest priority under the Legacy Priority is xDevice.
Updating ThinMan from a version lower than 8.2.1
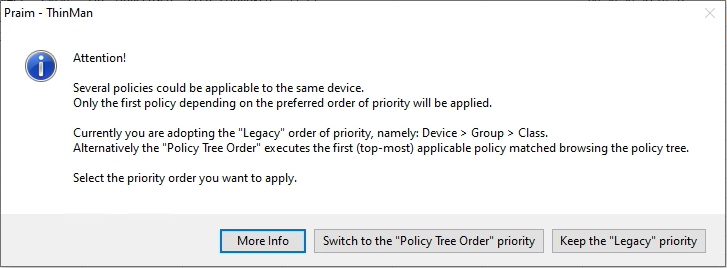
In case you update ThinMan from a version lower than 8.2.1 and at least one device belongs to more than one policy, the local console will ask whether you want to change to the Tree Order Priority Policy. Notice this choice is irreversible.
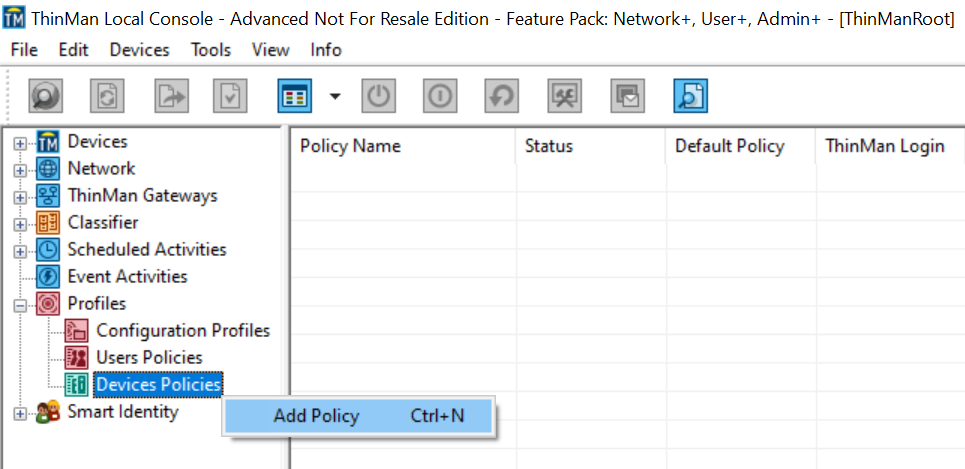
¶ Add a Device Policy
Open the Profiles tree, right click on Devices Policies and select Add Policy.
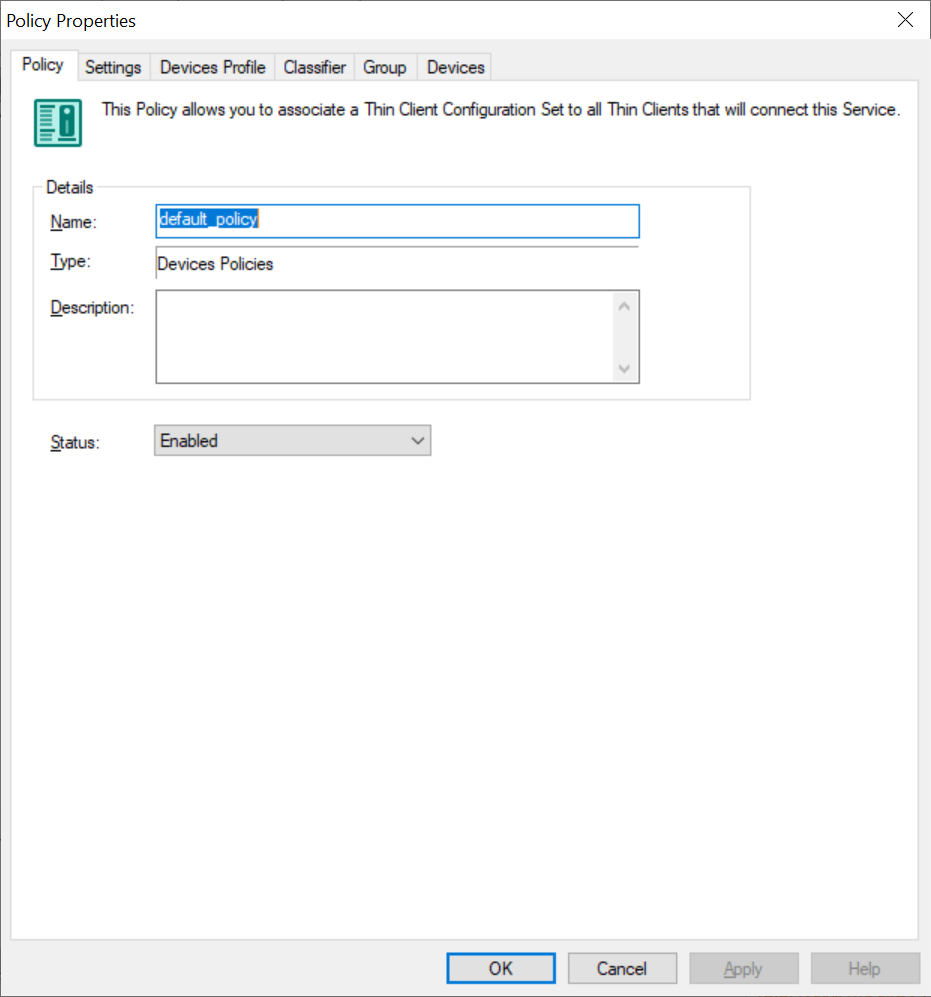
¶ Policy
The following window will be opened.
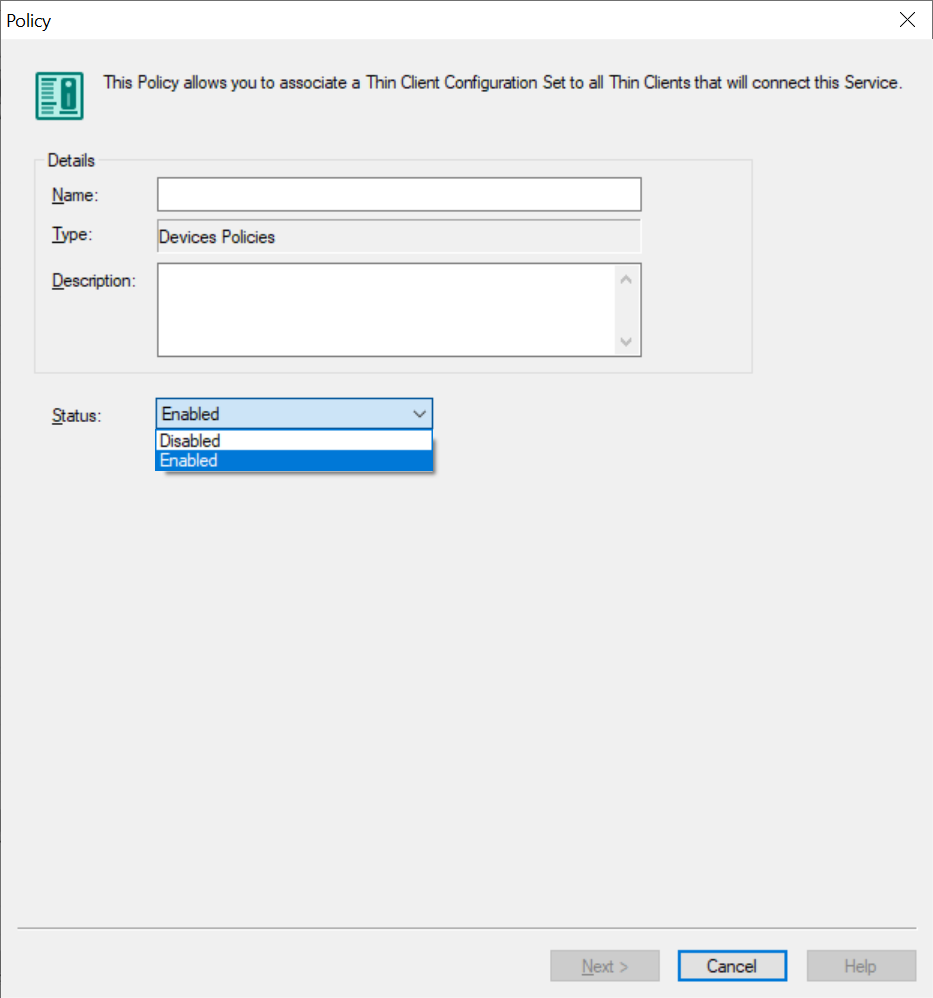
Enter the name of the policy and a description (optional)
The policy will be created by default with the status Enabled (the policy is activated after creation) but you can change it to Disabled. ThinMan will evaluate only enabled policies.
Click on Next to proceed.
¶ Settings
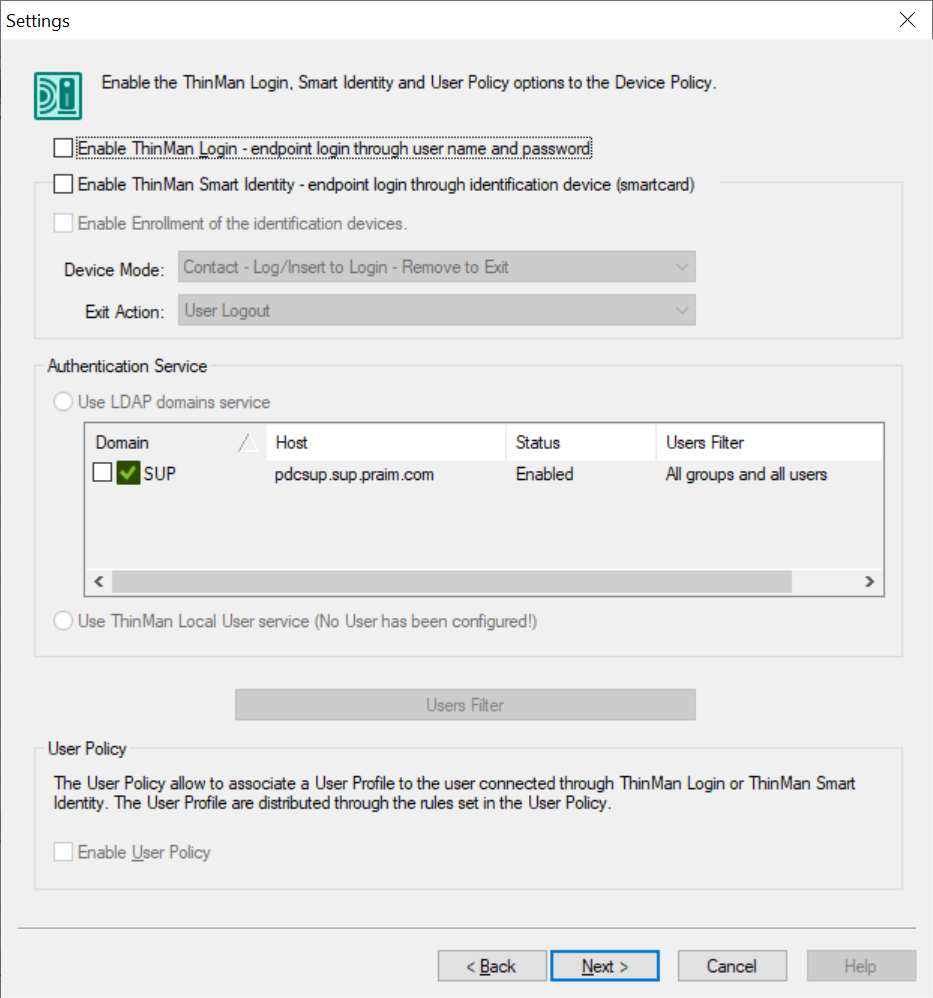
If you have the User+ Feature Pack, you will see the window shown below where you can configure the ThinMan Login, ThinMan Smart Identity and the User Policy.
-
Enable ThinMan Login: by selecting this option, the devices associated to this policy will request an authentication on the startup phase. The credentials entered by the user will be verified with the selected Authentication Service (the Active Directory Server or the ThinMan Local Users).
-
Enable ThinMan Smart Identity: by selecting this option, the devices associated to this policy will request an authentication through an identification device (smartcard) on the startup phase.
-
Enable Enrollment of the identification devices can be used only after selecting one of the previous attributes. This feature indicates that the devices associated to the policy will be used to enroll identification devices(smart cards). For more information, read Smart Identity - Device Policy Configuration
-
Authentication Service on this section you can select whether to use LDAP domains or ThinMan local users
-
Users Filter It allows to select a group of users of the authentication service for whom the policy will be applied. When clicking on the button Users Filter a window will be opened (See below). Select the source and optionally select if you want to search: only users/only groups/all; otherwise, write the name or part of the name of the user/group (in case you know it) and click on Search. Select from the left side list the users you want the policy to be applied on, then click on -> to add the users (click on <- if you need to remove a user from the list).
-
Enable User Policy If the Enable User Policy is flagged, after the authentication phase, the ThinMan Server will check whether the authenticated user is associated to a User Policy. If it is, then the ThinMan Server will send the corresponding Connection Profile for users (user profile) to the device.
Click on Next to continue.

ThinMan Login & Smart Identity See How to protect the Thin Client with ThinMan Login, ThinMan Smart Identity and Roaming Profile with Profile Manager for examples on how to use these parameters.
¶ Devices Profile
In the Devices Profile panel, indicate whether you want to apply a device profile. This step is not mandatory since the device policy can be created to only apply the ThinMan Login or the Smart Identity.
To apply a profile, select the Devices Profile checkbox and choose a devices profile you want to associate to this policy.
Also, indicate the conditions associated to the profile application:
-
Apply Profile changes to: By selecting All End Points (default value), the new profile will be sent to all associated devices. Instead, by selecting Factory Default only, the new profile will be sent only to new devices or those with a deleted configuration.
-
Overwrite changes on End Point: By selecting Yes, the profile will be re-sent to the device if the configuration has been changed on the endpoint. This is a useful feature to maintain all devices configurations aligned. By selecting No, the changes on the device configuration will be preserved.
-
Maintain End Point Settings: it is possible to maintain the network/video settings after sending the profile.
- The Maintain Network Settings is selected by default; when you deselect, the devices associated to the policy will take the network parameters values from the device profile (which could include the same hostname).
- The Maintain Video Settings is not selected by default; meaning, the devices associated to the policy will take the video parameters values from the device profile. Otherwise, the devices will keep the current values.

Click on Next to continue.
Static IP Address
If the endpoints use static IP Address, we suggest to select the Maintain Network Settings option.
¶ Classifier
In the following panel, you may associate the policy to values of classes.

When a device classified as the selected values turns on, the policy will be applied and the endpoint will import the associated profile.
Be careful when you reclassify a device, if the new class value is associated to another policy, the reclassified device will receive the profile associated to that policy. ThinMan will apply policies depending on the value owned by the device when it turns on.
Click on "Next" to continue.
¶ Groups
In the following panel, you may associate the policy to groups of devices.
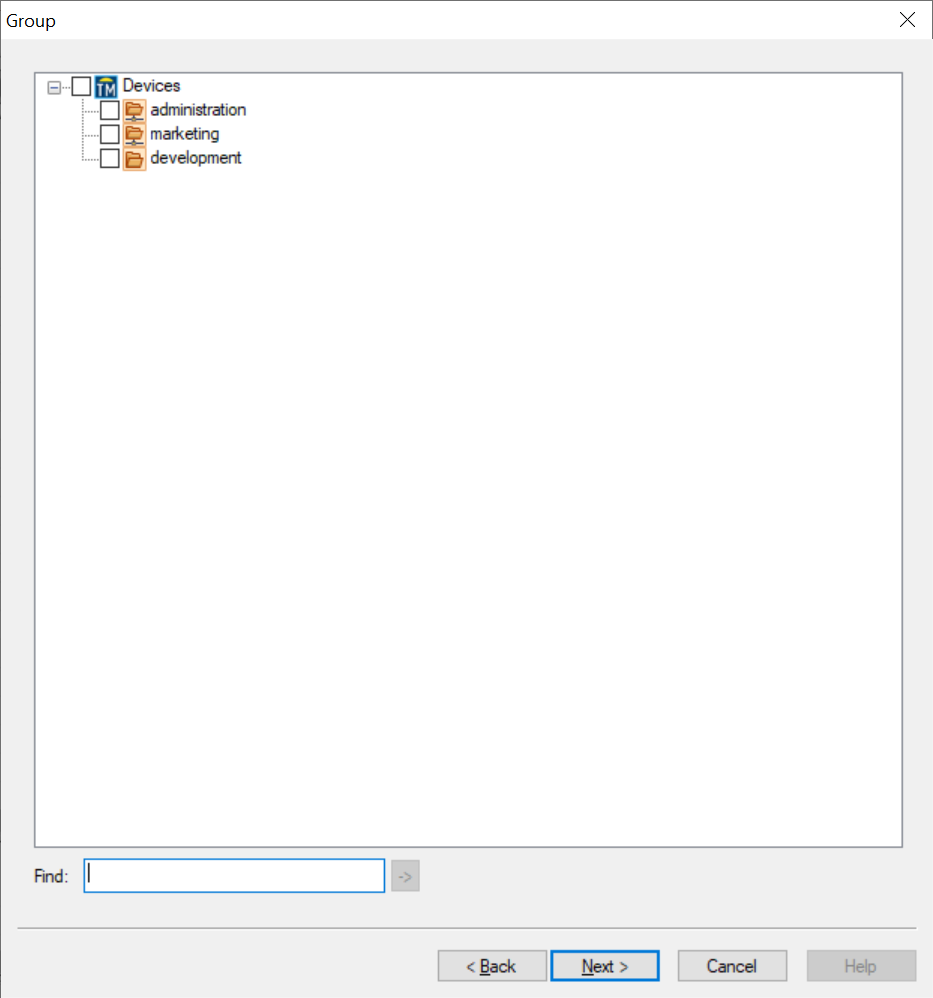
If a device is move from one group to another (either manually or because the device has been placed in another IP range) and the second group is under another policy, the endpoint will be under that policy.
Click on Next to continue.
¶ Devices
In the following panel, you may associate the policy directly to devices.
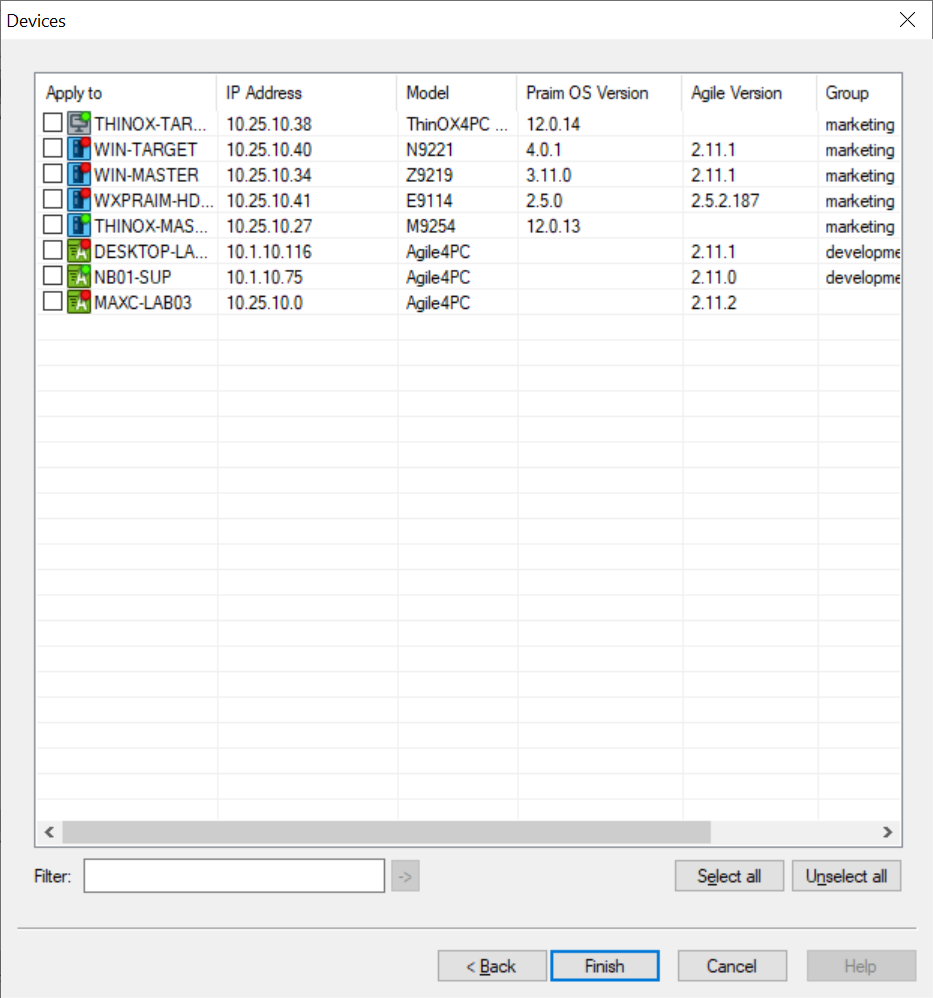
Click on Finish to create and save the policy.
A new Devices Policy is created under the Devices Policies tree.

Select the devices policy to show on the Working Area the list of devices associated to that policy. The list might be dynamic since it could include the devices of a class or group, therefore to the rules that associate the policy to device, groups, and classification.
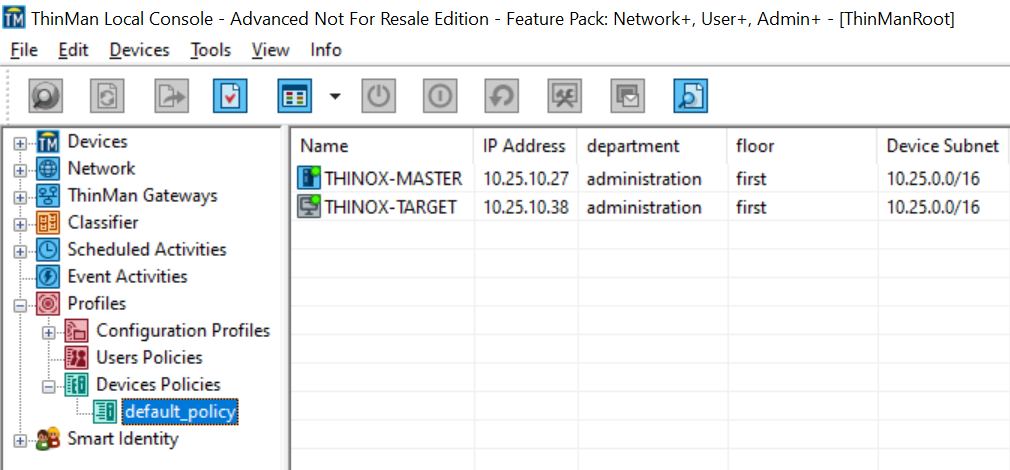
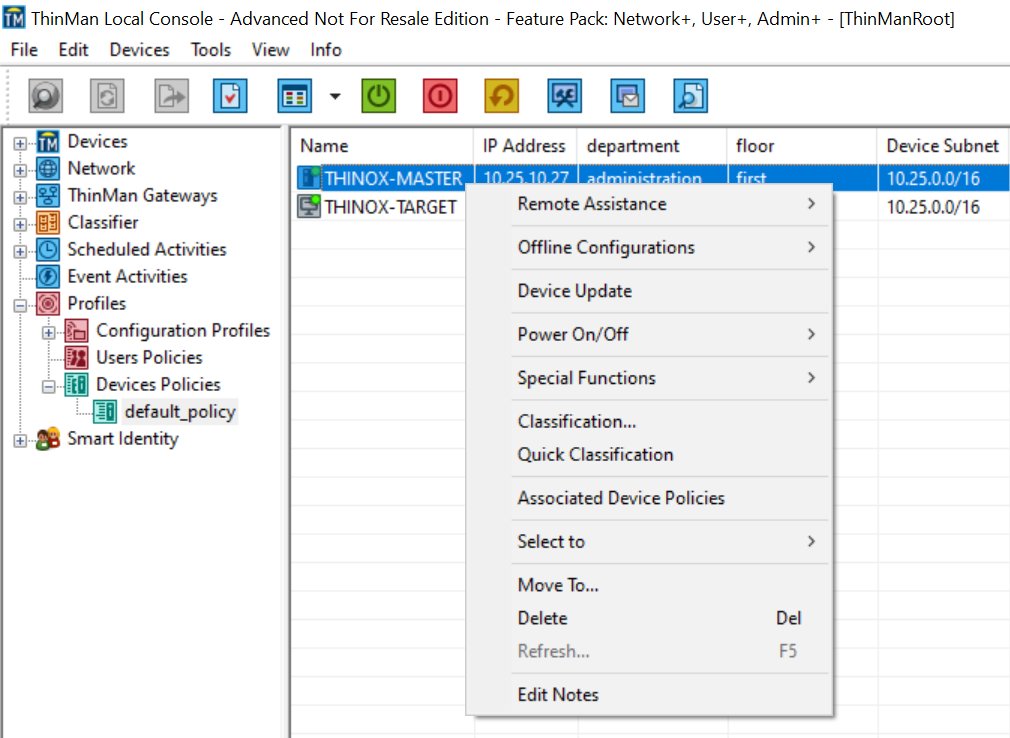
By right-clicking on a device in this list, the contextual menu will be shown (See Object Contextual Menu).
¶ Attributes for devices related to Devices Policy
For every device, the console shows attributes that are related to Devices Profile Management. The attributes are:
| Device Profile Status | It is the status of the device related to the profile manager. Its value can be: Not Managed: in this case, the device cannot be managed by Profile Manager. E.g. the devices that have not being configured to point the ThinMan server (communication protocol: https unlinked) will have this attribute with value Not managed. Profile Unavailable: this status corresponds to devices that are not associated to any Device Profile. Also, when a device is associated to a Device Profile that does not contain a Configuration Set compatible with the device's family. To be applied: this status corresponds to a device that needs to be rebooted in order the policy to be applied. Applied: this status corresponds to a device where the current associated policy has already been applied. |
| Device Policy | Indicates the name of the device policy currently associated to the device. |
| Device Profile | Indicates the name of the device profile currently associated to the device. |
| Device Configuration Set | Indicates the name of the Configuration Set currently associated to the device. |
| Date of last sent Dev. Prof. | Date and Time of the last device profile being applied. |
| Last sent Dev. Prof. | Name of the last device profile being applied. |
| Last sent Dev. Pol. | Name of the device policy associated to the last device profile being applied. |
| Last sent Dev. Conf. Set | Name of the configuration set being applied. |
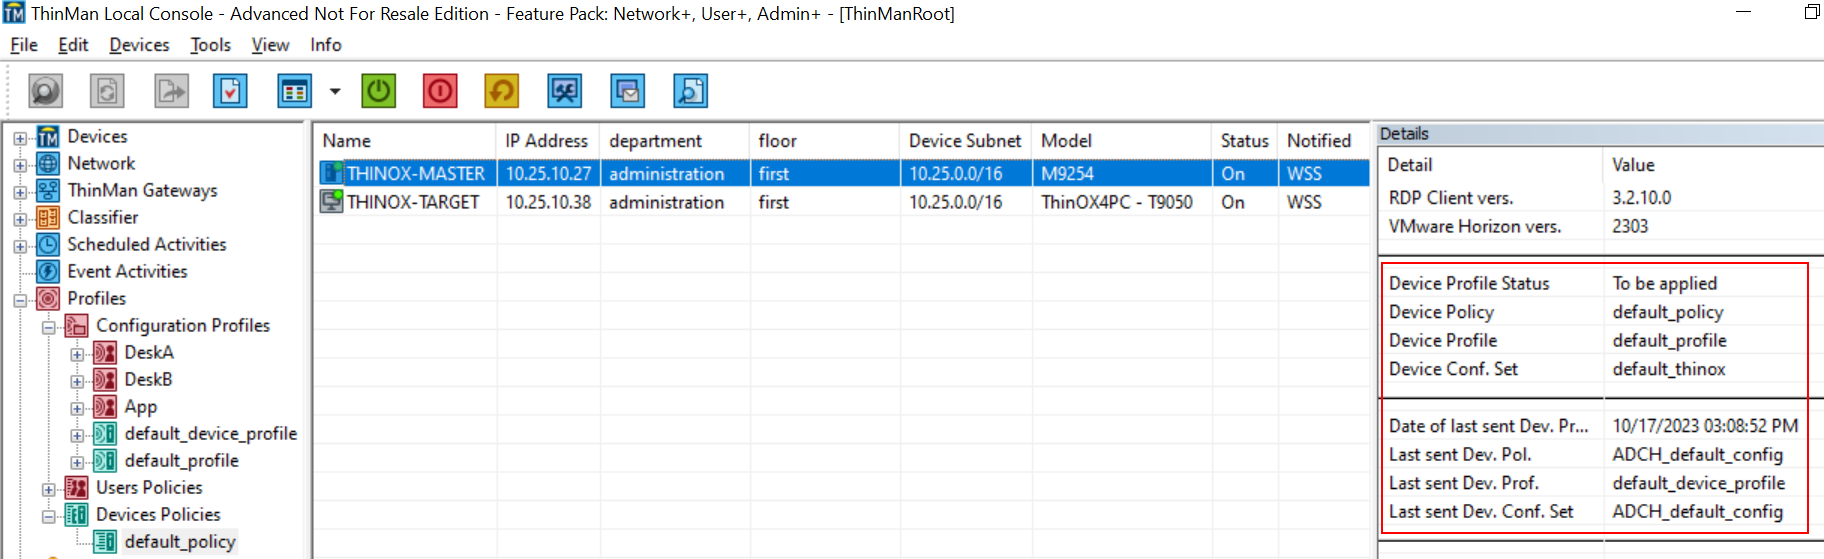
On the image below, we can see an example. The device THINOX-MASTER has just been configured. By looking into the details area, the device is now under the policy default_policy that contains a device profile named default_profile which contains a configuration set named default_thinox. But the device has already been configured before. The name of the last device profile sent to the device was default_device_profile containing the configuration set ADCH_default_config; finally, the name of the policy containing that device profile is ADCH_default_config.
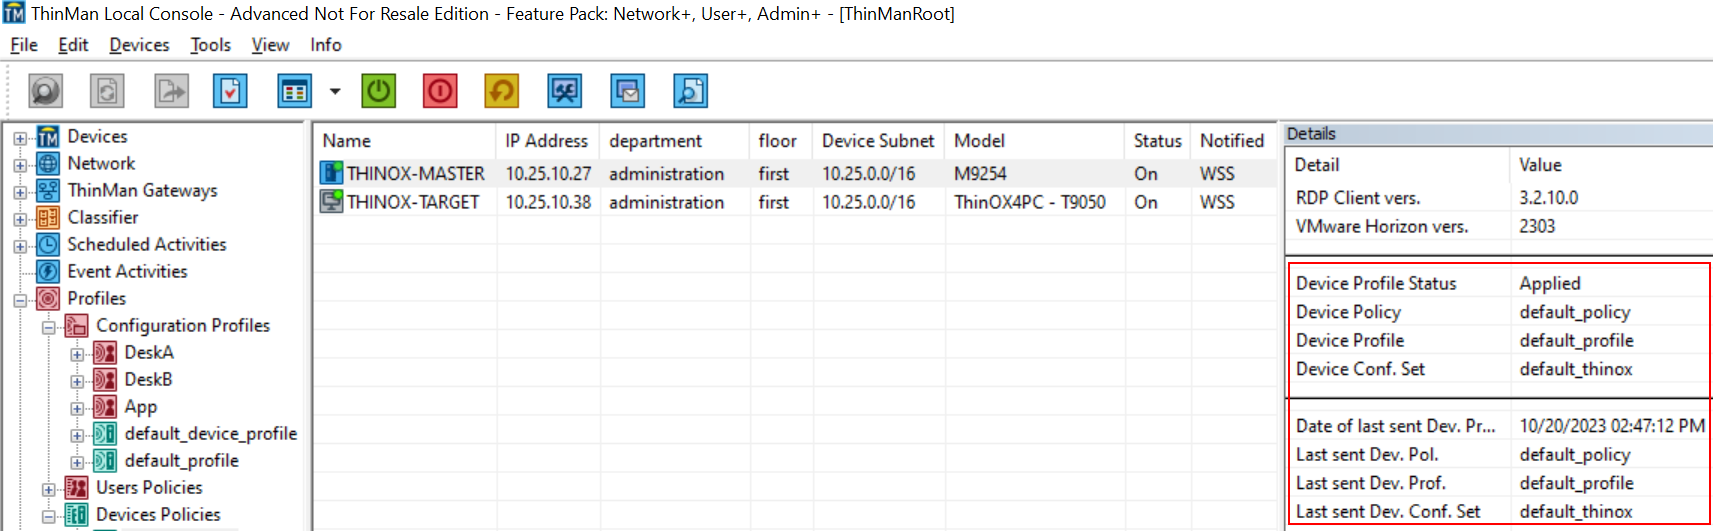
On the next reboot, the THINOX-MASTER device's attributes will changed as shown below.
¶ Contextual menu of a Devices Policy
Right click on a Devices Policy to access its contextual menu.
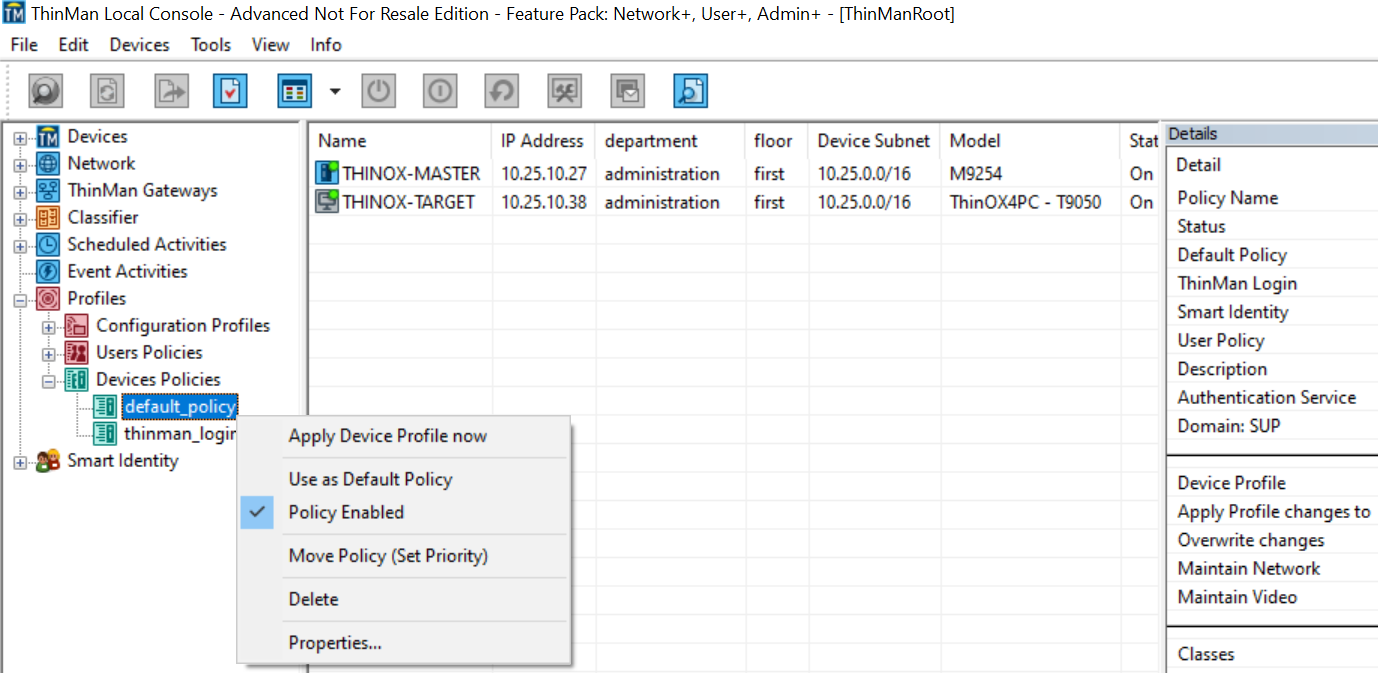
¶ Apply Device Profile now
Use this command in case you need to apply the Device Profile to all the devices associated with the Device Policy. Only the devices having the Device Profile Status with the value To be applied will be immediately rebooted.
¶ Use as Default Policy
A default policy (if existing) is used by all the devices that have not been associated to a device policy.
Default Policy is used in Zero Config with Profile Manager.
To make a policy a Default Policy, right-click on the device policy and select Use as Default Policy.
The Default Policy icon is marked with a little tick (See window below).
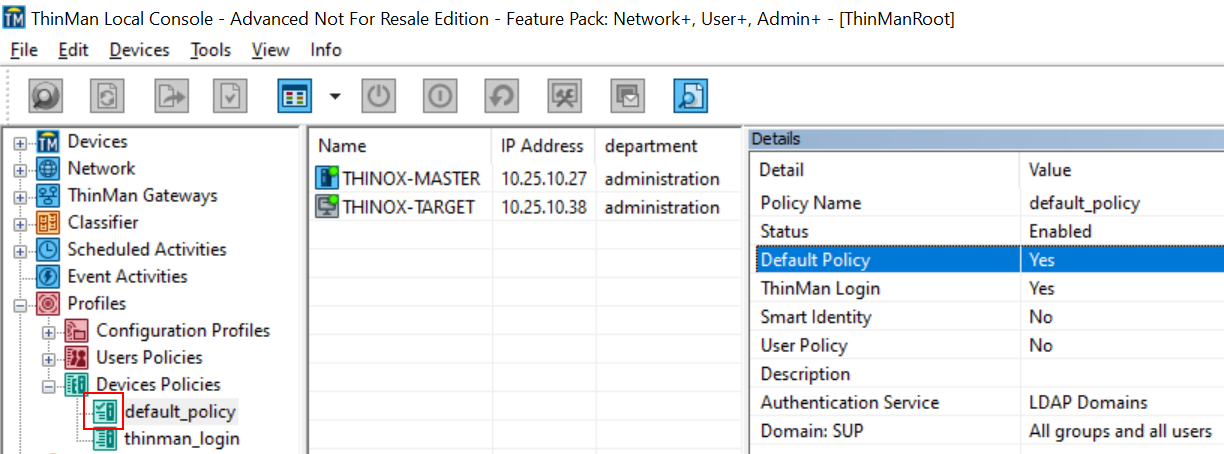
There can be only one default policy.
¶ Policy Enabled
It indicates that the Device Policy is currently enabled. You can enable or disable a policy by clicking on Policy Enabled.
¶ Move Policy
Devices Policies can be ordered using this functionality. A device can be associated to more than one policy (either because the device belongs to the selected class value, group or because it has been selected individually) but only one will be applied on the device. For more information read the Device Policy Priority section.
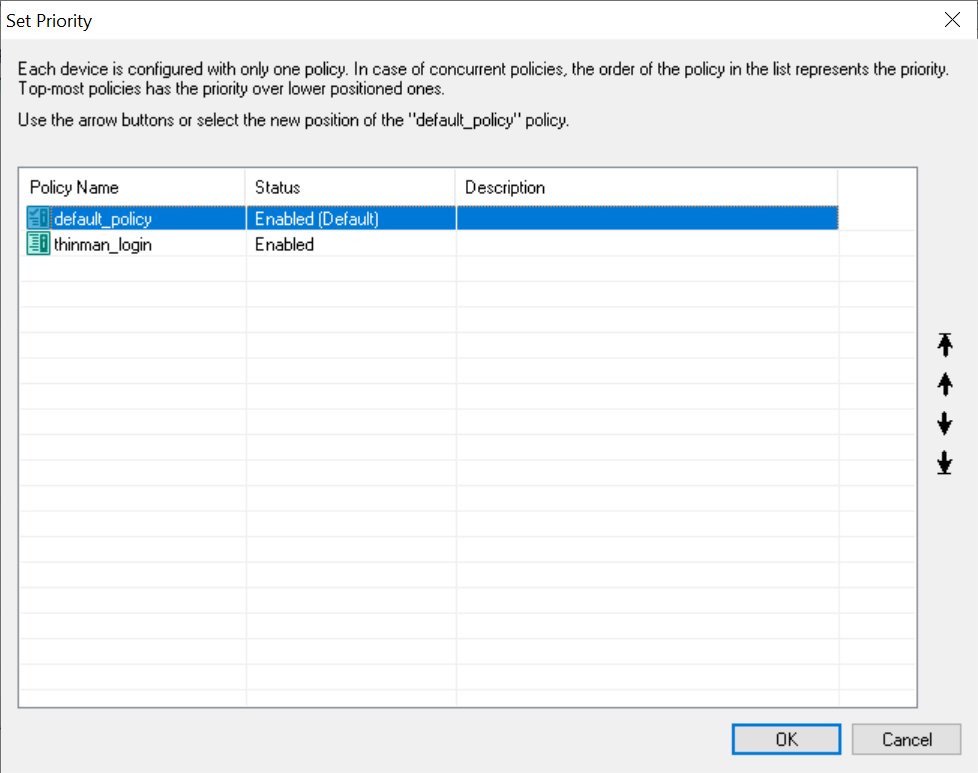
From the Devices Policies tree, select the device policy you want to change priority and move it by clicking on:
- Move home: it moves the policy to the first place.
- Move up: it moves the policy one place up.
- Move down: it moves the policy one place down.
- Move end: it moves the policy to the last place.
¶ Delete
If you want to delete a Devices Policy, select it from the Devices Policies tree and click on the Delete option.
Confirm by clicking on yes.
¶ Properties
From the Devices Policies tree, select the device policy and click on Properties....
In the first tab, you may change Name, Description and Status of the policy. In the other tabs, you may change all the parameters explained on the above sections.
Save the changes by clicking on OK.