Commands contained in this contextual menu are highly dependent on the device O.S.
¶ ThinOX
For ThinOX devices you will see the following menu:

-
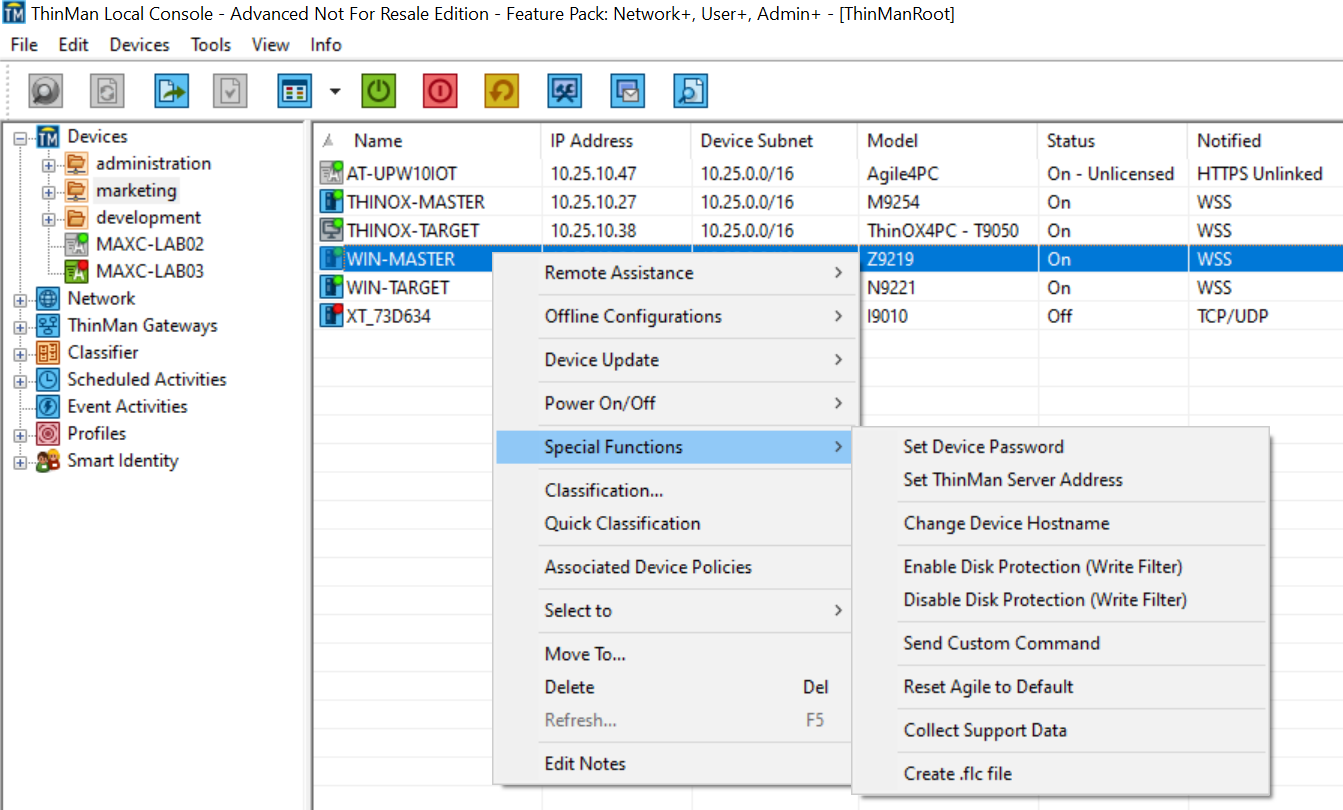
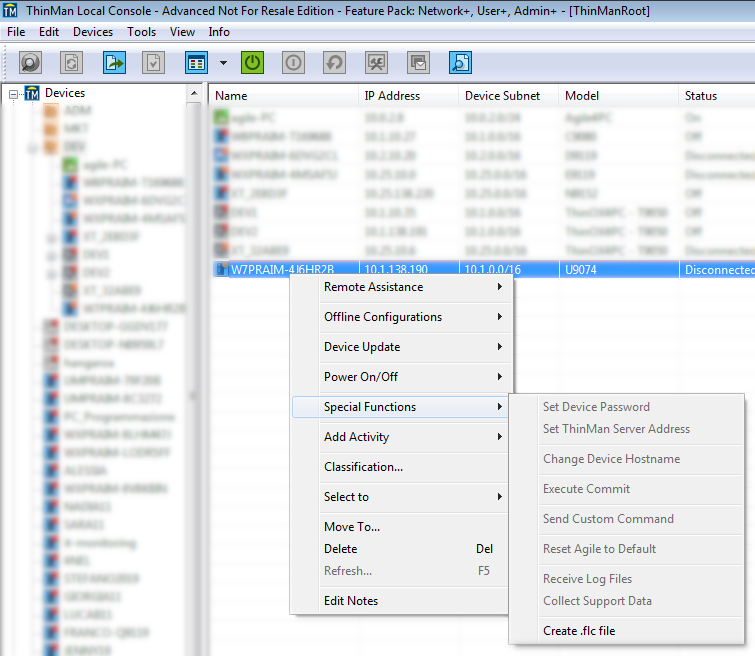
Set Device Password: It sets the device password on the thin client. The command will ask for the new password.
-
Set ThinMan Server Address: It sets the ThinMan Address on the device (read How to Setup ThinMan Address on Thin Client for more information on the options available in the configuration). If you plan to execute this operation manually on many devices, you can set the default value for these parameters in the Options - General Configuration.
-
Change Device Hostname: It allows to change the device name; the new hostname is asked, and then the command set the new hostname on the device.
-
Enable/Disable Always Power On and Disable Always Power On: It allows enabling/disabling a device to be always powered-on. If the device receives a power-off command (manual or from the ThinMan), it will reboot itself. This operation is useful for ThinMan Power-ON strategy (read more about Contextual Menu - Power On Off Reboot).
-
Screen Saver Image: It allows to personalize screen saver image. The image has to be in xpm format, and the maximum file size is 512 KB.
-
Remove Custom Screen Saver Image: It removes the personalized screen saver image.
-
Wallpaper Image: It allows to personalize wallpaper image. The image has to be in jpg format, and the maximum file size is 512 KB.
-
Remove Custom Wallpaper Image: It removes the personalized wallpaper image.
-
Send Custom Command: A custom command is a specific command file that Praim provides to customers in need of a particular configuration. Read Custom Command Repository for more information.
-
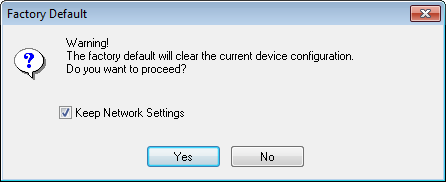
Reset Configuration to Factory Default: It will reset the thin client configuration to its original status as if it were out-of-the-box. The thin client will lose all the configuration parameters. Keep network settings will maintain information related to the network configuration and the ThinMan Server Address configuration. Select it in case you want to preserve the network parameters(useful when static IP Address is already configured on the thin client).
-
Collect Support Data: This command allows to save a "*.zip" file containing all the information needed by the Praim Support team. Use it if requested and send the file to the support team. The file is named as CollectSupportData_#MACADDRESS_YYYY-MM-DD_HH-MM-SS.zip where #MACADDRESS is the Mac Address of the device, and other numbers represent the date/time of the operation.
-
Create .flc file: This command saves a file with all the license information on it. The file can be used by the Praim Toolkit to inject a license on a restored device (read Praim Toolkit: How to create Recovery USB Key for ThinOX, add the .flc file using the Add Licenses button).
¶ Windows 10 IoT
On Praim Windows 10IoT devices you will see the following menu:
-
Set Device Password: It sets the device password on the thin client. The command will ask for the new password. The password corresponds to the user Admin (admin for B91-VDI model).
-
Set ThinMan Server Address: It sets the ThinMan Address on the device (read How to Setup ThinMan Address on Thin Client for more information on the options available in the configuration). If you plan to execute this operation manually on many devices, you can set the default value for these parameters in the Options - General Configuration.
-
Change Device Hostname: It allows to change the device name; the new hostname is asked, and then the command set the new hostname on the device.
-
Enable Disk Protection (Write Filter): The Write Filter protects the hard disk (flash memory) from changes, by default it is enabled on Praim Windows Embedded devices.
-
Disable Disk Protection (Write Filter): When disabling the write filter, the hard disk can be written without protection.
-
Send Custom Command: A custom command is a specific command file that Praim provides to customers in need of a particular configuration. Read Custom Command Repository for more information.
-
Reset Agile to Default: It will reset the parameters available in the Agile Configurator to its original values. The device will lose only the Agile parameters. Eventually installed software, eventually changed parameters out of the Agile interface are not modified.

You can select to Keep Network Settings; in this case, it will maintain information related to the ThinMan Server Address configuration.
How to really reset a Windows 10 IoT device to Factory Reset
To be sure to wipe all the settings and the installed software on a Windows 10 IoT device read this link: [Windows 10 IoT - Restore a device to Factory Default] (/W10IoT2019LTSB/Device_Administration/Restore_a_device_to_Factory_Default).
- Collect Support Data:
It allows to save a "*.zip" file containing all the information needed by the Praim Support team. Use it if requested and send the file to the support team. The file is named as CollectSupportData_#MACADDRESS_YYYY-MM-DD_HH-MM-SS.zip where #MACADDRESS is the Mac Address of the device, and other numbers represent the date/time of the operation.
It will ask you which type of log you want to create (see image below).

- Agile Log: It contains the Agile log files, it is checked by default.
- System Log: It contains the O.S. log files. Select it only when specified by the Praim Support Team.
- System Info: It contains information related to the system. Select it only when specified by the Praim Support Team.
- Create .flc file: This command saves a file with all the license information on it. The file can be used by the Praim Toolkit to inject a license on a restored device (read Praim Toolkit: How to create Recovery USB Key for Windows Embedded, add the .flc file using the Add Licenses button).
¶ Agile4PC
On PCs or thin client from other brands where Agile has been installed you will see the following menu:
-
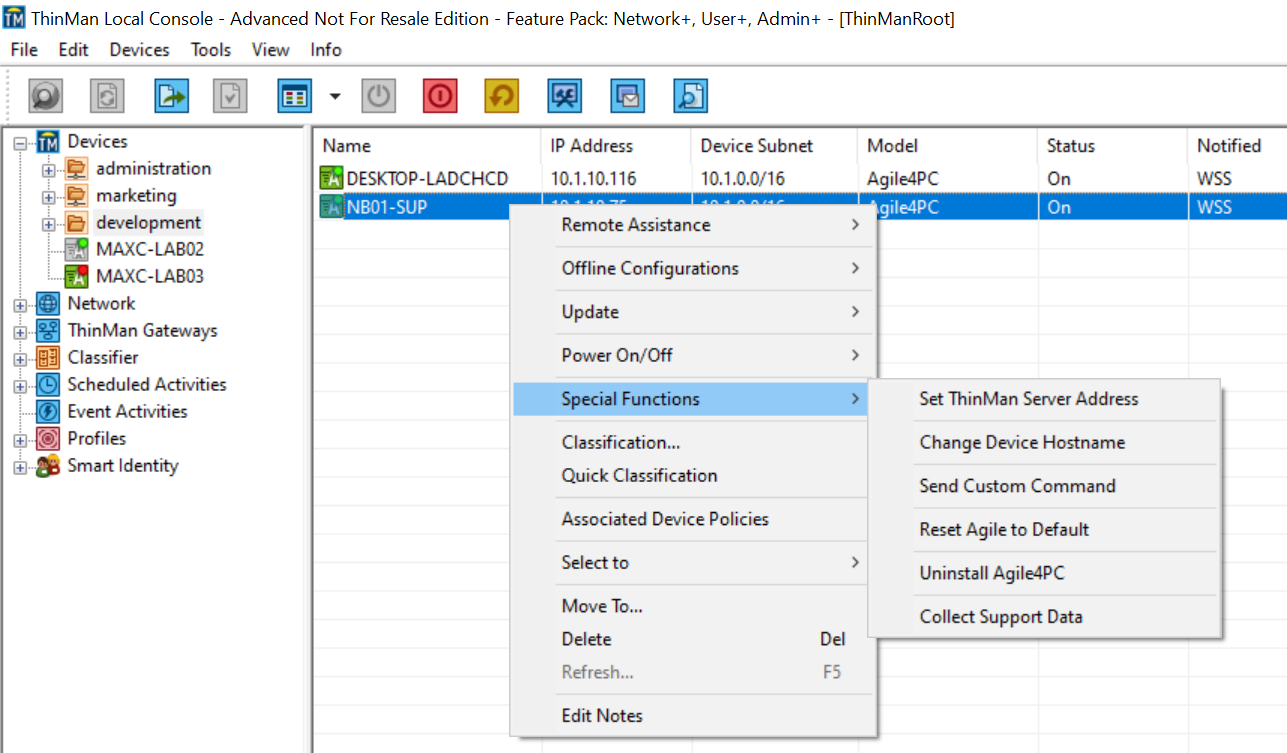
Set ThinMan Server Address: It sets the ThinMan Address on the device (read How to Setup ThinMan Address on Thin Client for more information on the options available in the configuration). If you plan to execute this operation manually on many devices, you can set the default value for these parameters in the Options - General Configuration.
-
Change Device Hostname: It allows to change the device name; the new hostname is asked, and then the command set the new hostname on the device.
-
Send Custom Command: A custom command is a specific command file that Praim provides to customers in need of a particular configuration. Read Custom Command Repository for more information.
-
Reset Agile to Default: It will reset the parameters available in the Agile Configurator to its original values. The device will lose only the Agile parameters. Eventually installed software, eventually changed parameters out of the Agile interface are not modified.
You can select to Keep Network Settings; in this case, it will maintain information related to the ThinMan Server Address configuration.
-
Uninstall Agile4PC: From version 8.5.1. it is possible to uninstall Agile from an Agile4PC device. Be aware, once uninstalled you will not be able to control the device from the ThinMan console.
-
Collect Support Data: It allows to save a "*.zip" file containing all the information needed by the Praim Support team. Use it if requested and send the file to the support team. The file is named as CollectSupportData_#MACADDRESS_YYYY-MM-DD_HH-MM-SS.zip where #MACADDRESS is the Mac Address of the device, and other numbers represent the date/time of the operation. It will ask you which type of log you want to create (see image below).
- Agile Log: It contains the Agile log files, it is checked by default.
- System Log: It contains the O.S. log files. Select it only when specified by the Praim Support Team.
- System Info: It contains information related to the system. Select it only when specified by the Praim Support Team.
¶ WES7
On Praim WES7 devices you will se the following menu:
-
Set Device Password: It sets the device password on the thin client. The command will ask for the new password. The password corresponds to the user Admin (admin for B91-VDI model) except for Agile4PC where the command it is not available.
-
Set ThinMan Server Address: It sets the ThinMan Address on the device (see How to Setup ThinMan Address on Thin Client for more information on the options available in the configuration window that will appear). If you plan to execute this operation manually on many devices, you can set the default value for these parameters in the Options - General Configuration.
-
Change Device Hostname: It allows to change the device name; the new hostname is asked, and then the command set the new hostname on the device.
-
Execute Commit: It permits to execute a commit on the thin client. Pay attention because a commit will save on DOM disk all the modification done onto the operating system.
-
Send Custom Command: A custom command is a specific command file that Praim provides to customers in need of a particular configuration. Read Custom Command Repository for more information.
-
Reset Agile to Default: It will reset the parameters available in the Agile Configurator to its original values. The device will lose only the Agile parameters. Eventually installed software, eventually changed parameters out of the Agile interface are not modified.
You can select to Keep Network Settings; in this case, it will maintain information related to the ThinMan Server Address configuration.
-
Receive Log Files: It receives from the device a collection of log files. The files are saved in a compressed format in the DeviceLogs directory under the ThinMan ProgramData folder (default directory is: C:\ProgramData\Praim\ThinMan\DeviceLogs). The compressed file is named as DeviceLog_#MACADDRESS_YYYY-MM-DD_HH-MM-SS.zip where #MACADDRESS is the Mac Address of the device, and other numbers represent the date/time of the operation. Typically this file will be requested from the Praim Support team in case of debugging.
-
Collect Support Data: This command allows to save a "*.zip" file containing all the information needed by the Praim Support team. Use it if requested and send the file to the support team. The file is named as CollectSupportData_#MACADDRESS_YYYY-MM-DD_HH-MM-SS.zip where MACADDRESS is the Mac Address of the device, and other numbers represent the date/time of the operation.
-
Create .flc file: This command saves a file with all the license information on it. The file can be used by the Praim Toolkit to inject a license on a restored device (E.g.: see Praim Toolkit: How to create Recovery USB Key for Windows Embedded, add the .flc file using the Add Licenses button).
¶ WES8
For WES8 devices you will see the following menu:

-
Check and Store Credential: It is used to check whether the stored device password is correct or not. If the password is not correct or it is not stored on a specific device, ThinMan will request the new password and, once verified, save it for the next manual operation. The password is saved for the console session time. The command can be executed on multiple devices. The menu is enabled only for powered-on devices.
-
Store Credential: It is used to store the password for automatic operation (Scheduled or Event Activities). The password is not checked but only saved. Remind that an error in the password means that automatic operation cannot be performed. The command can be executed on multiple thin clients.
-
Set ThinMan Server Address: It sets the ThinMan Address on the device (see How to Setup ThinMan Address on Thin Client for more information on the options available in the configuration window that will appear). If you plan to execute this operation manually on many devices, you can set the default value for these parameters in the Options - General Configuration.
-
Collect Support Data: This command allows to save a "*.zip" file containing all the information needed by the Praim Support team. Use it if requested and send the file to the support team. The file is named as "Data_MACADDRESS_YYYY-MM-DD_HH-MM-SS.zip" where "MACADDRESS" is the Mac Address of the device, and other numbers represent the date/time of the operation.
-
Create .flc file: This command saves a file with all the license information on it. The file can be used by the Praim Toolkit to inject a license on a restored device (E.g.: see Praim Toolkit: How to create Recovery USB Key for Windows Embedded, add the .flc file using the Add Licenses button).
¶ Teradici
For Teradici devices you will see the following menu:
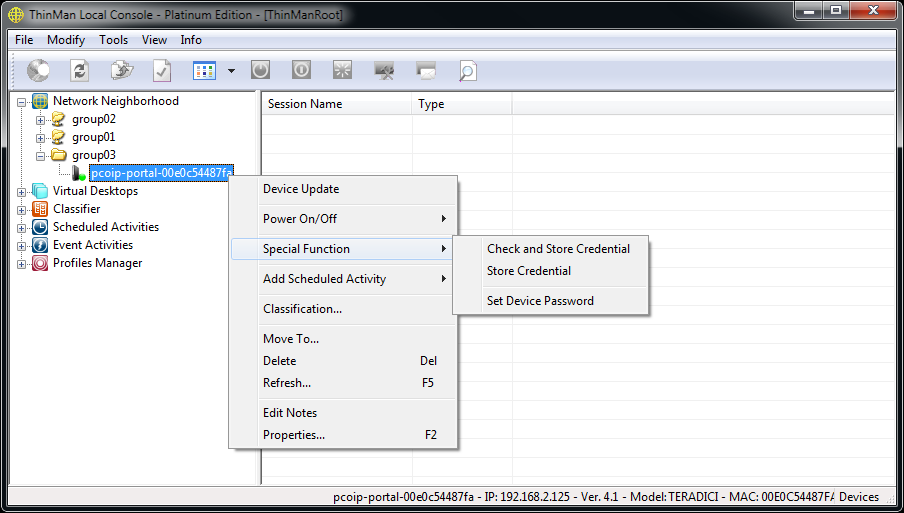
-
Check and Store Credential: It is used to check whether the stored device password is correct or not. If the password is not correct or it is not stored on a specific device, ThinMan will request the new password and, once verified, save it for the next manual operation. The password is saved for the console session time. The command can be executed on multiple devices. The menu is enabled only for powered-on devices.
-
Store Credential: It is used to store the password for automatic operation (Scheduled or Event Activities). The password is not checked but only saved. Remind that an error in the password means that automatic operation cannot be performed. The command can be executed on multiple thin clients.
-
Set Device Password: It sets the device password on the thin client. The command will ask for the new password. The password corresponds to the user Admin.