Remote Desktop Client connection requires a Microsoft Remote Desktop Services server active and reachable over the network.
The default values of the RDP Client connection parameters are reported by the screenshots.
¶ "Type" tab
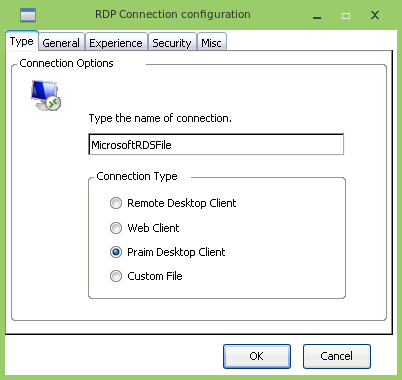
On the "Type" tab insert the name of the connection and select which type of connection you will use when the connection starts.
¶ Remote Desktop Client
It's the standard connection to a server. It will show the window (or full screen if selected) with the desktop inside it.
¶ Web Client
See RDP Web Client Connection for more information on this type of connection.
¶ Praim Desktop Client
See RDP Praim Desktop Client Connection for more information on this type of connection.
¶ Custom File
This type of connection allows using a file with ".rdp" extension to create the connection. All the parameters in the RDP file are used to connect the server. Use the "RDP File" tab (see below) to assign a .rdp file. (E.g. you could create the file in a Windows PC and use it to create a connection in ThinOX.)
Other tabs
Depending on the type of the connection, not all the tabs will be available; only those that are relevant to the type of connection selected in the "Type" tab.
¶ "General" tab
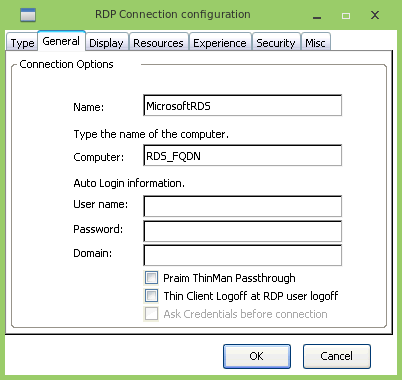
On the "General" tab you have to insert the "Computer" address (can be an IP Address or a hostname) where the RDS server resides.
You can also insert a credential, "User name", "Password" and "Domain", that the connection will use to log in automatically to the server. In this case, no information needs to be entered by the user when the connection starts. It is also possible to pre-compile only "User Name" and/or "Domain" so these fields will be already compiled when the connection starts (they can be also altered by the user).
Other options that can be enabled are:
- Praim ThinMan Passthrough: enable this option if you are using "ThinMan Login"; in this way the credential entered are used by the RDS connection. "ThinMan Login" protect the thin client, requesting the credential, from unauthorized use. See How to protect the Thin Client with ThinMan Login for more information on this feature.
- Thin Client Logoff at RDP user logoff: use this option together with one of the other to return to the login screen when the RDS connection is closed or logged off.
- Ask Credentials before connection: enabling this option will ask the user for credential (through a dedicated window) before the thin client connects to the server. The entered credential will then be used by the connection.This option is modifiable if you set RDP Protocol 7 in use (see RDP Global Settings). This option cannot be set if "Praim ThinMan Passthrough" is enabled.
¶ "Display" tab
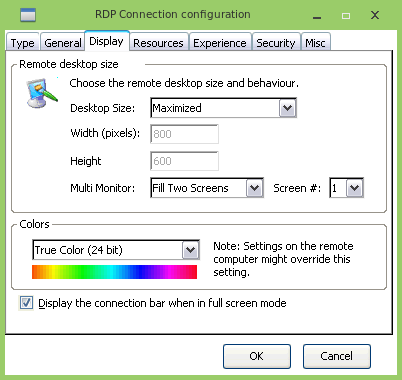
On the "Display" tab is possible to configure parameters regarding screen and presentation.
On a Praim C9010 thin client model, the connection is always executed in a full-screen window.
"Colors" allows selecting the color bit depth of the connection.
"Display the connection bar when in full-screen mode" when enabled visualize on the top a connection bar. The connection bar is shown when the mouse is placed near the top margin of the screen. It shows the IP Address or host-name of the RDS server and allows to close the connection and to pin the bar to be always visible.
Multimonitor: this control is available only if the thin client is configured to use the dual monitor and allows to define if the connection will use only a monitor or both of them.
¶ "Resources" tab
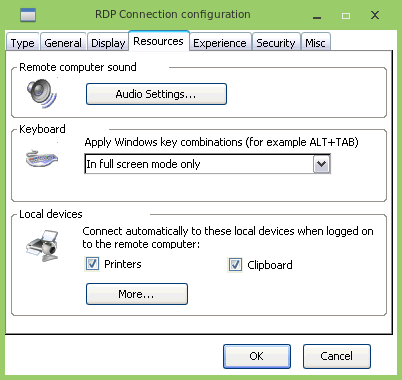
The "Local Resources" tab allows configuring which and how local devices are treated by the connection.
¶ Keyboard
On the "Keyboard" section select if combination key has to apply:
- "On the local computer": the combination keys are first intercepted in the local computer and then passed to the remote session
- "On the remote computer": the combination keys are first intercepted in the remote session and then passed to the local computer
- "In fullscreen mode only": if the connection run in full-screen mode, then the combination keys are first intercepted in the remote session and then passed to the local computer, else the combination keys are first intercepted in the local computer and then passed to the remote session
¶ Local Devices
On "Local devices" section you may select to share local devices in the remote session. "Printers" and "Clipboard" can be shared using appropriate options while pressing "More..." will open a new configuration window allowing more choice.
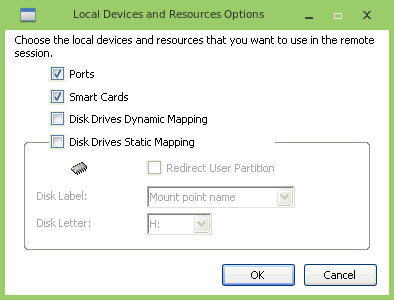
Many local devices can be enabled to be shared with the remote session:
- "Ports": will share parallel and serial port,
- "Smart Cards": will share smart card devices,
- "Disk Drives Dynamic Mapping": will share disk drives in the thin client under the remote directory "UsbDrive"; it allows to insert and share USB devices run-time during the connection usage; the USB device content is placed in a directory in the remote "UsbDrive" folder;
- "Disk Drives Static Mapping": will share disk drives already presents on the thin client when the connection is started (does not allow to insert USB devices during the session) and will use more conditions (see below);
- "Redirect User Partition": will share the device User Partition (if available on the device model) in the Remote Desktop session,
- "Disk Label": indicates which name is assigned to the connected devices; "Mount point name" will use the name of the connected device and create a remote directory, "Incremental Letter" will start from the below "Disk Letter" parameter and assign a single letter for every connected device,
- "Disk Letter": if "Disk Label" is set to "Disk Letter" every USB devices is shared using a remote drive letter starting from the one chosen with this parameter.
¶ Audio Settings
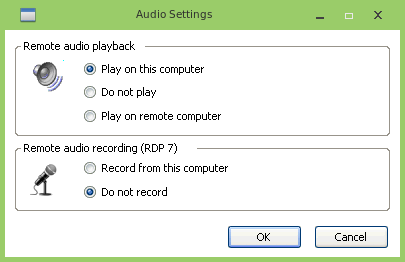
Clicking on "Audio Settings..." will open the window above.
The audio generated by the remote session can be:
- "Play on this computer": played on the thin client
- "Do not play": not played
- "Play on remote computer": played on the server
Only for RDP 7 protocol version (see below) the audio input can be:
- "Record from this computer": recorded from the thin client in the remote session
- "Do not record": not recorded anyway
¶ "Experience" tab
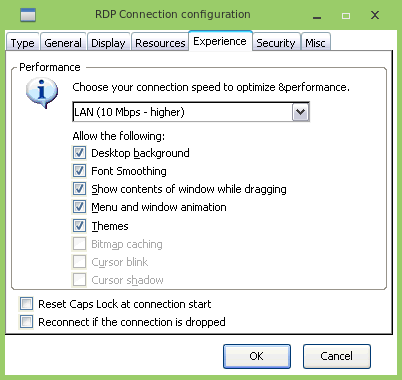
The "Experience" tab allows defining which features has to be enabled or disabled on the remote connection. These features affect bandwidth usage and local/remote CPU usage.
A list of predefined sets are available and can be selected using the combo box. The features can be also individually flagged. Depending on the RDP Global Settings not all the features may be available.
The parameter "Reconnect if the connection is dropped" retry to connect to the server if the connection dropped for some reasons (e.g. network failure, etc.).
The parameter "Reset Caps Lock at connection start" will disable the Caps Lock status when the connection starts.
¶ "Security" tab
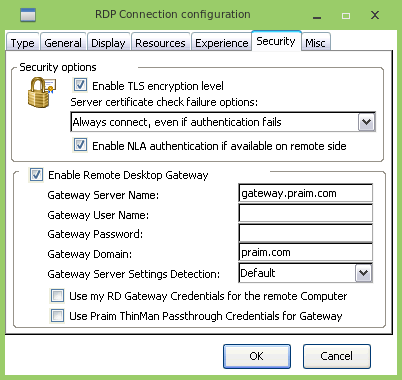
On the "Security" tab you can configure the part related to the Security options:
- "Enable TLS encryption layer": allows using TLS (Transport Layer Security) to encrypt communication. TLS has to be enabled also on the server side. Read Microsoft server documentation for more information (e.g.http://technet.microsoft.com/en-us/library/cc770833.aspx for Windows Server 2008, other versions of O.S. might have different documentation).
- "Server certificate check failure options": allows deciding, depending on certificates, if the connection has to be executed (to manage certificates click on "Import CA certificate", see below). Possible options are:
- "Always connect even if authentication fails": the connection is executed even if the server is not certificated
- "Warn me if authentication fails": there is a warning window if the server is not certificated
- "Do not connect if authentication fails": the connection does not start if the server is not certificated
- "Enable NLA authentication if available on remote side": if enabled and supported by the RDS server requests credential before to start the connection. Has to be enabled on the server side. Read Microsoft server documentation for more information (e.g. http://technet.microsoft.com/en-us/library/cc732713.aspx for Windows Server 2008, other versions of O.S. might have different documentation).
Certificate Management
Remember that the certificates for the Remote Desktop Client can be added and managed from the Certificate Manager window available in the Control Panel. Read About Certificates to have information on the format of certificates.
You can also specify the configuration of the "Remote Desktop Gateway":
- "Enable Remote Desktop Gateway": will enable the use of the gateway;
- "Gateway Server Name": insert the server name (FQDN or IP Address) of the gateway server (remember: if you need to install certificates use the Certificate Manager applet);
- "Gateway User Name", "Gateway Password", "Gateway Domain": insert the credentials that have to be used to access the gateway. If some fields are not filled, when the connection starts they are requested by the user.
- "Gateway Server Settings Detection": select how
- "Default": same behavior of "Direct";
- "Direct": the connection is made directly to the gateway;
- "Detect": detect if the connection can be made directly to the remote computer instead of the gateway; if affirmative the connection is made to the remote computer else the connection is made to the gateway;
- "Use my RD Gateway Credentials for Remote Computer": enable this parameter if the connection to the remote computer will use the same credentials used to connect to the gateway. In this case, the Auto Login fields in the "General" tab are disabled;
- "Use Praim ThinMan Passthrough Credentials for Gateway": enable this parameter if the ThinMan Login is used on the thin client; the credentials used on the ThinMan Login will be used to access the gateway. In this case, the credentials fields of the gateway are disabled.
¶ "Misc" tab
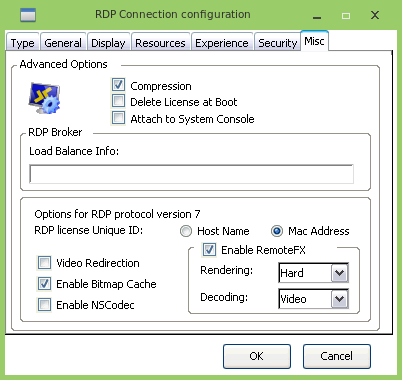
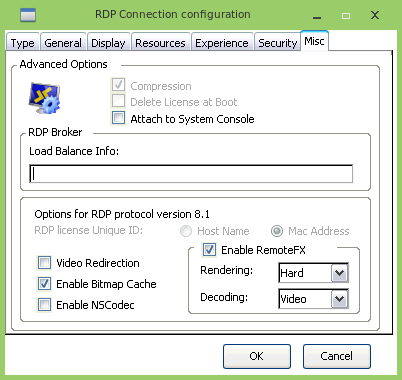
On the "Misc" tab you can configure options for RDP 7 or RDP 8.1 protocol version (the version has to be selected on the RDP Global Settings window):
- "Compression": enables compression of the streamed data.
- "Delete License at Boot": at every boot of the thin client, the licenses present on it will be deleted.
- "Attach to System Console": if enabled connect to the system console of the server.
- "RDP Broker"-"Load Balance Info": insert the load balance server (in the form "tsv://..."). If you are using a broker with a collection insert the string "tsv://MS Terminal Services Plugin.1.collection name" and replace "collection name" with the actual name of the collection to access it.
Enhanced options for Protocol version 7 or 8.1:
- "RDP License unique ID": select to use the hostname or the mac address to request the license to the server. It is preferable to use MAC address, in this way changing the name of the thin client will not affect the license request.
- "Video redirection": it software decodes on the thin client video played on the server. It is available when the client connects to Microsoft 2008 Server, Microsoft 2012 Server, Windows 7 Enterprise or Ultimate, Windows 8 Professional.
- "Enable Bitmap Cache": enables the cache of the bitmaps. It is convenient having it enabled to save network bandwidth.
- "Enable RemoteFX": it will enable the RemoteFX protocol (see also How to solve RDP performance problems):
- "Rendering": Hard, Soft tell the thin client to use hardware (acceleration) or software decoding. Better is 'Hard'.
- "Decoding": Video, Image tell the thin client which type of decompression using. Leave the default value
- "Enable NSCodec": enables NSCodec extension. See http://msdn.microsoft.com/en-us/library/ff635378.aspx for more information about NSCodec extension.
¶ Import RDP file tab
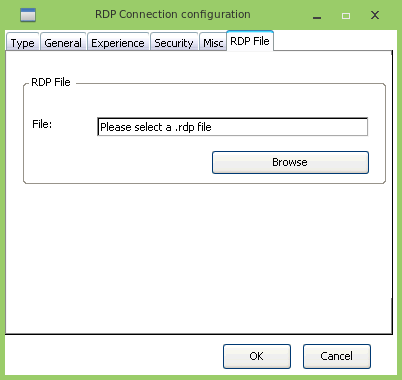
On the "RDP File" tab you can import a file with ".rdp" extension that contains all the information to connect a server (e.g. you can use a file .rdp that you create on a Windows PC). Save the file on a USB Key and connect it to the device. Click on "Browse" button.
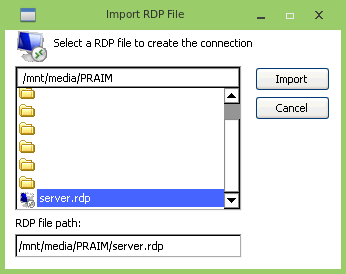
Navigate to the USB Key and select the RDP file that contains all the information for the connection. Click on "Import" to import the file in the connection.