VMware View client requires a VMware View farm or server active and reachable over the network.
The default values for the VMware Horizon View parameters are reported by the screenshots.
¶ Connection tab
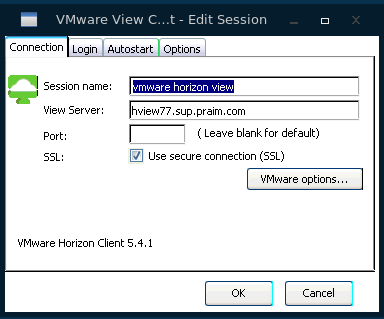
On the Connection tab you have to insert:
- Session Name to identify the connection name;
- View Server the address (either IP Address or hostname) where the VMware View server resides.
Other options that can be modified are:
- Port: the port on the server where the VMware infrastructure is listening for connections.
- SSL: enable it if you are using an encrypted connection.
- VMware options...: click on it to open the Vmware View Client Options window.
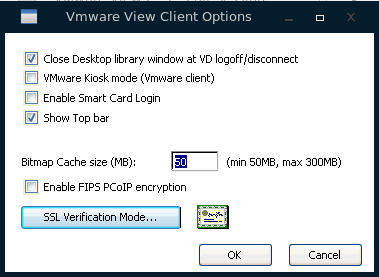
- Close Desktop library window at VD logoff/disconnect:
- VMware Kiosk mode (VMware client): Kiosk Mode is a particular mode in which the client can connect the VMware server. For more information refer to VMware documentation
- Enable Smart Card Login: allows the login through smart cards.
- Show Top bar: enables or not the top bar on the connection screen.
- Bitmap Cache size (MB): defines the maximum amount of memory dedicated to cache bitmap used by the client.
- Enable FIPS PCoIP encryption: allows to enable the FIPS encryption on the connection.
- Clicking on SSL Verification Mode... will change the behavior of the client depending on certificates:
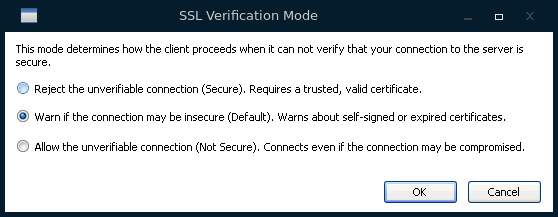
-
Reject the unverifiable connection (Secure). ...: the connection to the server will be rejected if certificates are not loaded on the client or they are not corresponding to the server.
-
Warn if the connection may be insecure (Default). ...: when connecting to a non-secure server the client warn and reject the connection if certificates are not valid.
-
Allow the unverifiable connection (Not Secure). ...: in any case, the connection to the server is executed
Click on OK will close the window.
-
Certificates Management
Remember that certificates for the VMware View Client can be added and managed from the Certificate Manager window available in the Control Panel. Read About Certificates to have information on the format of a certificate.
¶ Login tab
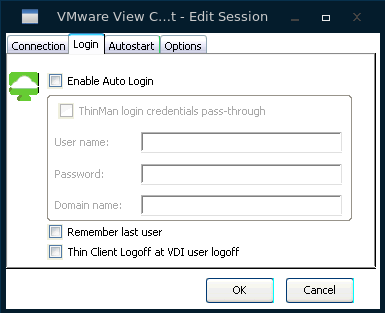
On the Login tab you will find settings about:
- Enable Auto Login: when this flag is enabled, the user is not asked for its credentials. Credentials can be entered either through the ThinMan Login or through the Username/Password/Domain fields appearing on the above window. Whether you do not indicate the Domain name, you will need to write it on the username field under the format: Domain_name\username or username@Domain_name.
- ThinMan Login credentials pass-through: it allows to use the Auto Login Connection Credentials for the ThinMan Login. Read How to protect the Thin Client with ThinMan Login for more information. Enable this flag only if the thin client is protected by the ThinMan Login.
- Username, Password, Domain Name: Credentials used for the Auto Login). These credentials are used when the connection is executed; if the login phase fails, the connection will ask for new credentials.
- Remember Last User: will remember and propose the last logged username when the connection starts;
- Thin Client Logoff at VDI user logoff: this property may be configured when the thin client is protected under the ThinMan Login. It allows to logoff from ThinMan Login when clicking on Logoff from the remote desktop.
¶ Autostart tab
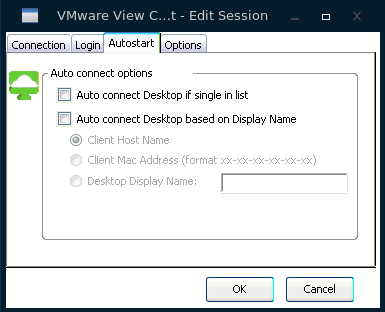
On the Autostart tab the user can configure these options:
- Auto connect Desktop if single in list: if enabled and there is only a virtual desktop available from the VMware farm, it will be automatically connected.
- Auto connect Desktop based on Display Name: it will connect to a specific virtual desktop depending on:
- Client Host Name: it will connect to the virtual desktop whose name is the same as the thin client hostname
- Client MAC Addressw: it will connect to the virtual desktop whose name is the same as the thin client MAC Address
- Desktop Display Name: it will connect to the virtual desktop whose name is the same as the string specified in the text field
¶ Options tab
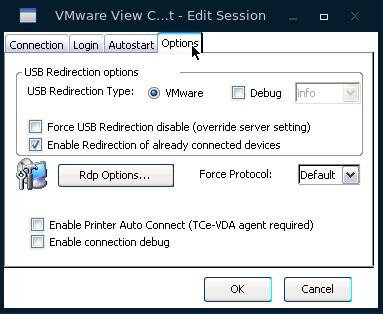
Options tab allows configuring various options.
- Force USB redirection disable...: disable the USB redirection feature independently from the server configuration.
- Enable Redirection of already connected devices: allows exporting to the USB redirection already connected devices.
- Enable connection debug: when flagged it activates the writing of a debug file. Use only when requested by Praim Support team.
Force Protocol: will use the Default protocol (server-side choice) or try to use the RDP or PCOIP protocol.
RDP Options...: will open the RDP Global Settings window where, in addition to other parameters, you can select the version of the protocol to be used for the RDP connection.