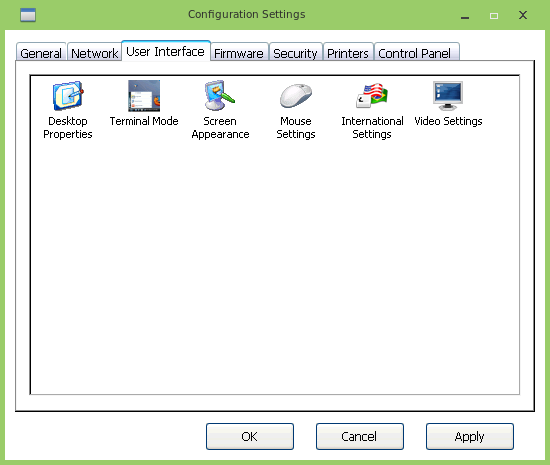
The “User Interface” tab allows users to achieve a higher level of interface customization according to their needs and preferences. The panel may give different types of interface customization depending on the device model.
Please note that some thin or zero client models may not have all the settings explained in this chapter (e.g. C9010 model does not have "Terminal Mode" and "Desktop Properties" controls).
¶ Mouse Settings
It allows to set the type of mouse in use and to customize both the pointer speed and acceleration.
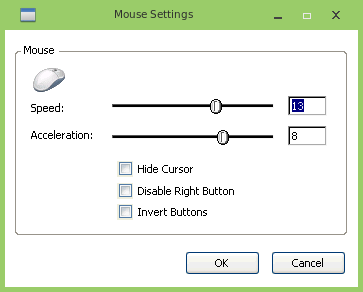
Speed: the "Speed" slider controls the sensitivity of the mouse to movement. A slower speed means a lower mouse sensitivity.
Acceleration: the "Acceleration" slider controls the mouse acceleration.
Hide Cursor: if enabled it will not show the mouse cursor (beware to enable it because the mouse is enabled but only the cursor is not shown).
Disable Right Button: when enabled does not allows to use the right button to show the contextual menu.
Invert Buttons: inverts right and left click behavior. Useful for left-handed users.
¶ International Settings
Through this dialog box, the users can set both the language for the system and the keyboard.
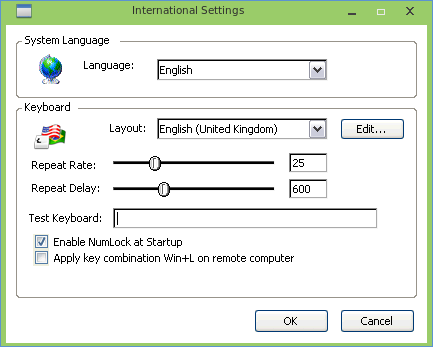
System Language: selects the language for the user interface.
Keyboard Layout: selects the layout for the keyboard.
Edit: by clicking on “edit” users can customize the keyboard definition file.
Enable NumLock at Startup: it automatically enables NumLock when Thin Client starts.
Repeat Rate and Delay: this option allows to customize both the repeat rate key and delay. The Repeat Rate controls the rate at which a key is repeated after being held. The Repeat Delay controls the time delay before a key is repeated after being pressed; as the Repeat Delay is increased, the time a key must be held before it is repeated increases accordingly.
Apply key combination "Win+L" on remote computer: when enabled the "Win+L" keyboard shortcut is not managed from the thin client keyboard manager but is sent to the virtual desktop.
¶ Screen Saver
The Screen Saver parameters have to be configured using the Power Management applet in the Control Panel.
¶ Video Settings
The "Video Settings" controller allows configuring many aspects of monitors, screen resolution, and color depth.
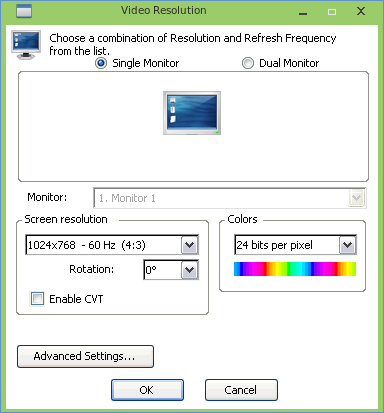
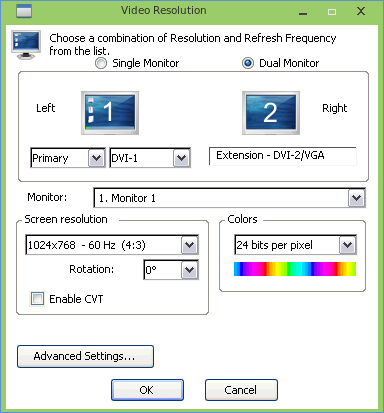
ThinOX Thin Clients support both single and dual monitor configurations.
Single / Dual Monitor: users can decide on a single or dual monitor station, defining specific features needed on each one. In case of a dual monitor, the arrangement (right/left) can be set out by specifying the SVGA/DVI source. NOTE: depending on the device model dual monitor arrangement may requires two DVI monitors or may require one VGA and one DVI monitor (eventually with a DVI/VGA adapters) or may require dual monitor adapter cable (DVI-I to SVGA/DVI).
Monitor 1/2: select from the drop down the monitor on which will be applied the chosen resolution.
Resolution: it allows to select the preferred resolution. "Autodetect" resolution try to detect the monitor native resolution and it depends on monitor models.
Colors: it allows to define the color depth.
Enable CVT: it enables display interface through “Coordinated Video Timings” protocol. It could be useful when using VGA monitors.
NOTE: changes will be effective after clicking on "OK" on the control panel. A pop-up will then request either to confirm or restore the chosen features (e.g. Monitor Resolution). Whether none of the options will be chosen or settings were wrong (black or blur video), the video will be restored automatically to previous settings after 30 seconds.
¶ Advanced Settings
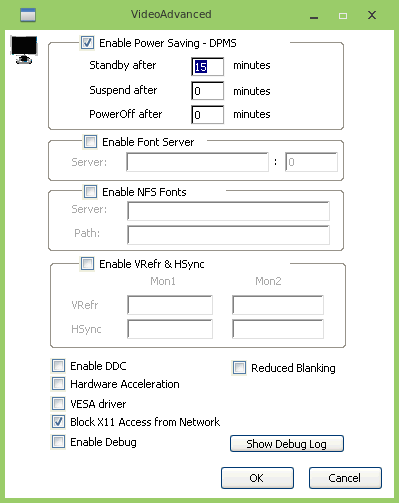
“Advanced settings” allows to:
Power Saving: enable monitor power saving settings (if supported by the connected monitor) (You can also use the using the Power Management applet in the Control Panel).
Font Server: enable to specify Font Server address and port.
Font via NFS: additional Fonts retrievable on specific Server through NFS protocol. Users can also customize more specific video management features.
Enable DDC: through Display Data Channel users can receive identification data on their screen.
Hardware Acceleration: it enables integrated video card acceleration.
VESA driver: it enables display management through VESA driver.
Enable Debug: it enables and allows debug information display.
Block X11 access from network: limit Thin Client access through X11 protocol.
Reduced Blanking: it allows to use the Coordinated Video Timings (see https://en.wikipedia.org/wiki/Coordinated_Video_Timings).
¶ Screen Appearance
Through “Screen Appearance” dialog box, users can choose screen theme, background color or customize their Thin Client wallpaper.
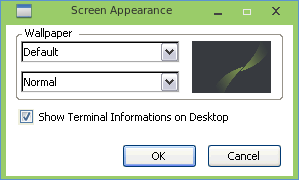
Wallpaper: it allows to select an image for desktop wallpaper (remember that a personalized wallpaper can be sent to the thin client using the ThinMan Console), and how to align it in the screen.
Show terminal information on the Desktop: by enabling this option, the device information will be displayed in the bottom right corner of the desktop. The information shown includes:
- Hostname
- IP address
- Mac Address
- Serial number
- Firmware Version
- Device Model
¶ Terminal Mode
It allows you to set different terminal GUI operation modes.
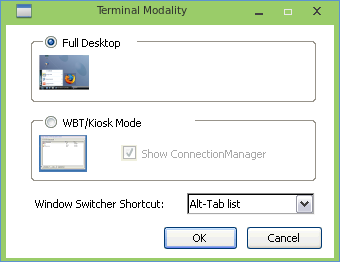
Full Desktop (default): Desktop Mode provides a familiar Windows-type look experience using taskbar with a Start menu as well as a desktop with program icons. Desktop mode is available for those users familiar with the standard MS Windows interface. For instance, users can set up and start different connections by clicking on "Praim" menu on the taskbar (lower-left side of the screen). WBT/Kiosk Mode: WBT/Kiosk mode is the classic Thin Client's user interface where a Connection Manager is displayed on the desktop (if the "Show Connection Manager" parameter is enabled). From here the users may launch, define, and edit connections. WBT/Kiosk mode provides a minimal, easy to use, interface for non-technical users. If the Connection Manager is not shown on the device startup then the users need to press CTRL+ALT+End to display the Connection Manager. Window Switcher Shortcut: it allows the configuration of the hotkeys on the terminal as follows:
- WBT mode: use CRTL+ALT+Arrow (Up or Down) to toggle between active applications.
- ALT-TAB List: use ALT+TAB to display a list of active applications.
- ALT-TAB: use ALT+TAB to toggle between active applications.
- CTRL-TAB: use CRTL+TAB to toggle between active applications.
- Shift+PagUp: use Shift+PagUP to toggle between active applications.
The Window Switcher Shortcut can be influenced by the settings of every connection created on the thin client.
¶ Desktop Properties
When Desktop Mode is selected, the following parameters are available for a further desktop customization.

Current Mode: shows the current mode set on the Thin Client. Taskbar: it enables taskbar customization. Desktop Icons: it allows to create shortcut icons on the terminal desktop:
- Control Panel: display the control panel icon on the desktop.
- Connection Manager: display the Connection Manager icon on the desktop.
- Show USB Devices: when plugged, shows the USB devices (mass storage devices) icons on the desktop.
- Popup Explorer on Hotplug Devices: automatically open the file explorer window when a USB device is plugged in.
- User Partition parameters: if a User partition is available (depends on the device model) these parameters allows to activate the User Partition, to show it on the desktop, to give write permission to the user or to share it via SMB protocol to the network.