The ThinOX support the sharing of locally attached printers using SMB, LPD/LPR or RAW protocols. It uses the CUPS (Common Unix Printing System) libraries.
Each of these protocols can be configured on any type of attached printer allowing the terminals to be used as a print server.
Important notice GDI Printers Not Supported
Please note that GDI printers are not supported on ThinOX operating system. These printers rely on proprietary Windows-based drivers and require the host computer to perform the print rendering, which is incompatible with ThinOX's Linux-based environment. For best compatibility and performance, we recommend using PCL or PostScript printers with native support for standard print languages.
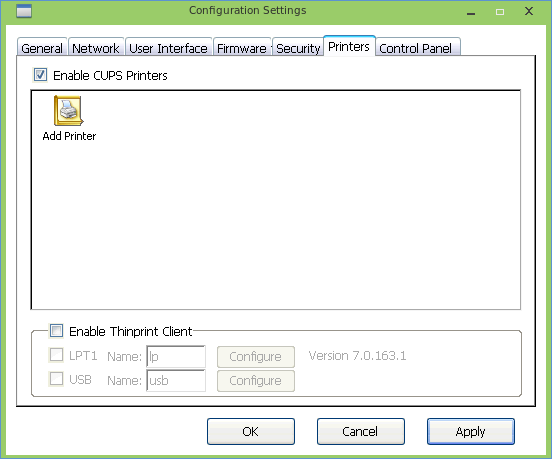
Flag the "Enable CUPS Printer" parameter and click "Apply" to enable the "Add Printer" icon.
¶ Add Printer
To add and configure a printer click on the Add printer icon and follow the printer configuration wizard instructions.
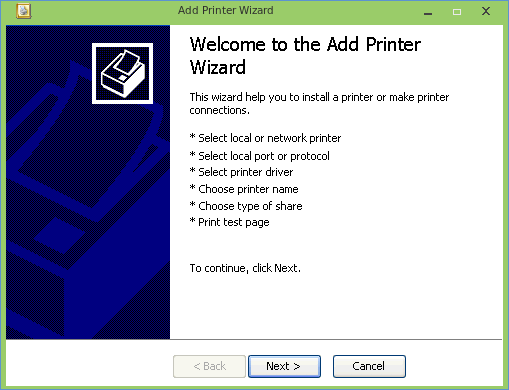

Select if you want to configure a locally attached printer or a network shared printer.
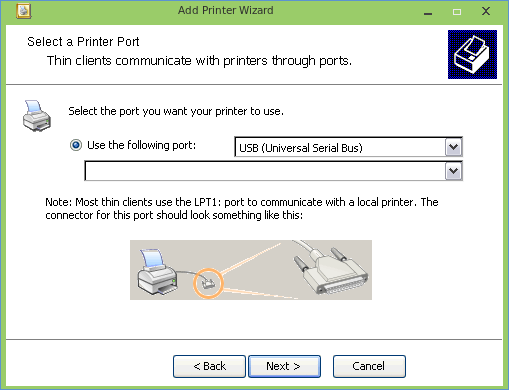
¶ Set Printer Server or Local Port
¶ Locally attached Printer
In case of locally attached printer select the type of connection port used (default USB).
¶ Network Shared Printer
In case of network printer select the protocol to be used and the printer server address (see below).
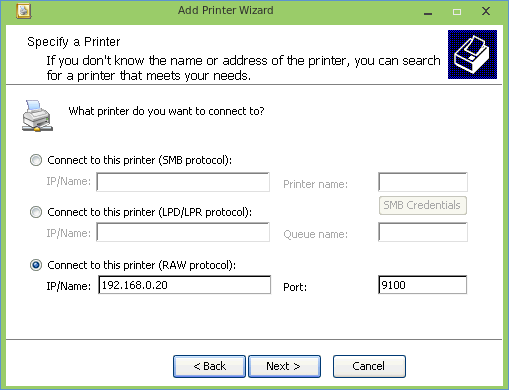
Connect to this printer using SMB protocol: this option allows to print on network printer via SMB protocol. You are required to enter printer IP address (or name), printer name and SMB user credential.
Connect to this printer using LPD/LPR protocol: this option allows to print on network printer via LPD/LPR protocol. You are required to enter printer IP address (or name), and Queue name.
Connect to this printer using RAW protocol: this option allows to print on network printer via a RAW protocol. You are required to enter
printer IP address (or name), and Port number. RAW printing uses prefixed TCP/IP ports starting at port 9100. The ports for RAW printing can be changed from their defaults.
¶ Name and Sharing
Note
Sharing the printer is not necessary to export it to Terminal Server environment.
Type or accept the printer name and define whether to use it as the default printer.
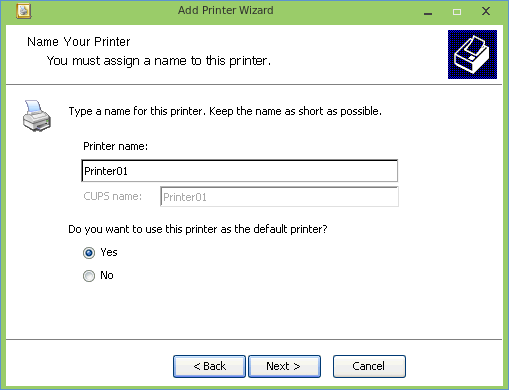
The CUPS name is limited to the first twelve characters of the Printer Name and will substitute the space character with the underscore character. This name is used on the server side when the printer is exported using the ICA o Terminal Server protocol.
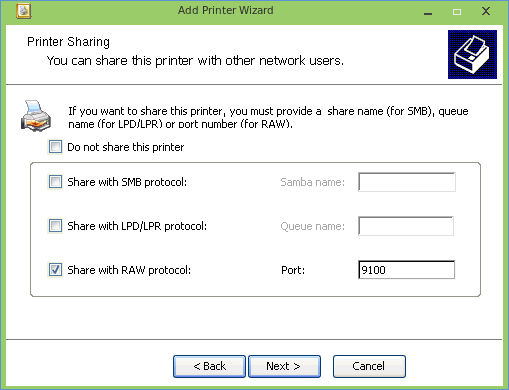
If you want to share the printer with other users, unflag the “Do not share this printer” option and select one share mode:
Share with SMB protocol: This option allows the local printers to be shared using the SMB protocol.
Share with LPD/LPR protocol: This option allows the local printer to be shared using LPD/LPR protocols.
When enabled, the "Line Printer Daemon" (LPD) will be started on the terminal, and accept requests for the enabled printers(only those printers which are enabled can accept LPR printing requests).
Each printer has a default "queue" name which is used to differentiate the local printer from a remote system. When the printer is enabled, the
queue name can be changed if needed.
For those printers which have configuration parameters, a Configure button is displayed on the right of the printer queue name. For COM port printers, the baud rate, flow control, parity, data bits, and stop bits may be configured. For NET printers, the IP address and queue name of the printer must be configured.
Example: a USB printer is connected to the terminal, LPD printing enabled, the USB printer is checked, and the queue name is "usb". In this case, only LPR "print jobs" with the port "usb" will be printed on the local USB printer.
LPD/LPR printing uses TCP/IP port 515.
Share with RAW protocol: This option allows the local printers to be shared using also the RAW protocol. RAW printing uses predetermined TCP/IP ports starting at port 9100. The ports for RAW printing may be changed from their defaults. It is possible to print RAW jobs locally on Parallel, Serial, and USB printers using different ports.
Once the thin client is rebooted the shared printer can be reached via the network with the selected protocol (SMB / LPD-LPR / RAW).
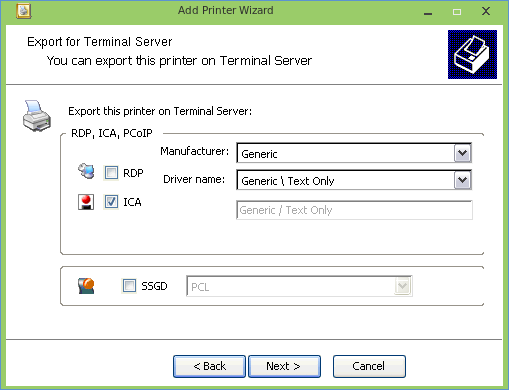
¶ Exporting and Selecting the Driver for Terminal Server (RDP or ICA protocol)
The attached printer can be exported to and used from the connected server through a remote connection using RDP or ICA protocol. In this case, each printer connected to the thin client will be available to the remote host (server or Virtual Machine) and will be available using the software driver installed on the host. To enable this feature, select the specific checkbox (RDP or ICA) and define the server printer driver name.
In the case the driver for the specific printer is not shown in the list, it is essential to install the printer driver on the host (Windows Server / Windows Virtual Machine) and then use the "Manual edit" mode (see below).
If the attached printer is supporting the Postscript (PS) language, you can select "MS Publisher Color Printer" (usually used for color laser printers) or "MS Publisher Imagesetter" (usually used for a monochromatic laser printer) in the "Driver name". These two drivers are typically available on the host (Windows server or Windows Virtual Machine) so the exported printer will use these generic drivers on the host.
If the attached printer does not support the Postscript language, or if specific features of the printer are needed, you have to select “Manual edit” in the "Driver Name". Then, in the text label, enter the description of the driver (not the name of the printer). The name of the driver has to be entered exactly as defined in the printer control panel of the host, re-copying carefully spaces and paying attention to differences between upper and lower case (e.g. "Samsung ML - Series").
When the thin client is connected to the server, a new printer will be available on the Windows server (host or virtual machine). Printing on this printer, available on the server, will print on the thin client local printer.
To print using the **Citrix Universal Printer Driver please refer to these links to configure **the server side:
- http://support.citrix.com/proddocs/topic/xenapp-xendesktop-75/cds-print-univ-print-server.html
- http://support.citrix.com/proddocs/topic/xenapp-xendesktop-75/cds-print-autocreate-client-printers.html
On the ThinOX client select to export the printer using the ICA protocol and set Manufacturer as "Generic" and driver name "Generic \ Text only". Once connected to the virtual server a new printer will be available in the "Device and Printer" window of the "Control Panel"; the name of the printer will be the CUPS Name and it uses the [UPD:PS] driver (currently the available driver is only the PS driver).
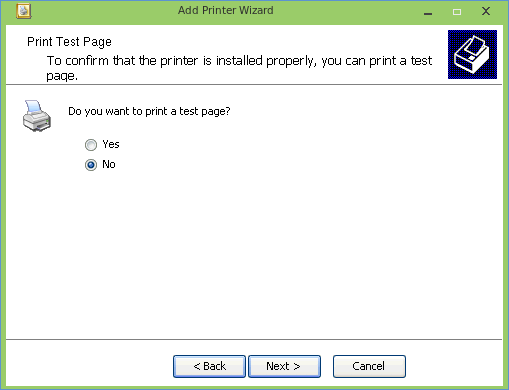
¶ Paper Size and Print a Test Page
Select the default printer page size. This feature will be used only for thin client local application (the size parameter is not used by shared
printers). Then select whether you want to print a test page or not.

¶ Completing Installation
Review all the configuration parameters and click on "Finish" to create the printer.

A new printer icon, with the printer name, will be shown in the Printers Panel.
Each printer configuration parameter can be modified after the wizard. To edit the printer properties, right click on the printer icon and select “Properties” menu.